This DIY tutorial is sponsored by Lowe’s Home Improvement. A healthy lawn takes some dedication to making sure it has the right nutrients and preventing and eliminating weeds. Here are some of the fundamental tips to help you develop a great lawn and prepare it for the summer heat!

A great lawn can be both beautiful and functional. To me there is nothing like the sparkle of the rising sun on the dew of a perfectly smooth carpet of grass. At the same time it’s a place for family to gather, to spend time and play games. There is nothing quite like it. A lawn is a system of living grass plants and those plants have needs just like any others. Learn to meet those needs and you can have a great lawn too!
Step 1 – Figure out What Species of Grass you Have
Every species of grass has slightly different needs and you want to be able to determine the exact requirements for yours! Grasses fall broadly into cool-season and warm-season grasses. Cool-season grasses include fescue, kentucky bluegrass, and perennial ryegrass and typically are grown in the northern half of the United States where temperatures can range from extremely cold in the winter to hot and dry in the summer. They grow at the highest rate when the air temperatures are in the 60-70s. Warm season grasses include bermuda, zoysia and centipede. They are typically grown in the southern states and grow at the highest rate in the summer. The easiest way to figure out the type of grass you have is to ask your neighbor that seems to know what they are doing. Then take a picture of your grass extremely close up. Type the name of the grass that the neighbor gave you in google images and compare to the picture you took of your own to confirm that they were correct!
Step 2 – Find a Guide on Lawn Care for Your Area or Grass Type
These grass specific guides will really help to give you the exact information that you need for your type of lawn. The information in this article is general and applies to almost any lawn type, but you want to be an expert so dig a little deeper! The best way to find these guides is to type into google: “lawn care guide *your state*”. Typically you will find an extension article published by a university that has a turf grass program. Here is the one that I found for NC (published by NC State University) when I did this search.
Step 3 – Determine What Nutrients Your Lawn Needs
In addition to sunlight, water and CO2, all plants need nutrients to grow. Your lawn is no different than any other living plant! While even neglected lawns can do decently in the spring and summer, if you want your lawn to thrive and survive through the summer it needs to have optimal growing conditions to make the most resilient stand of grass possible. The major nutrients that lawns need are nitrogen, phosphorus and potassium.
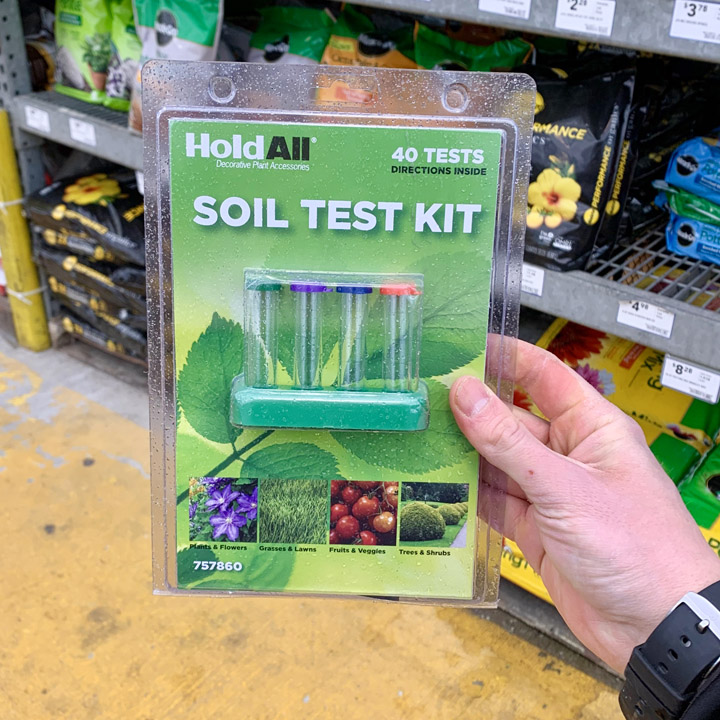
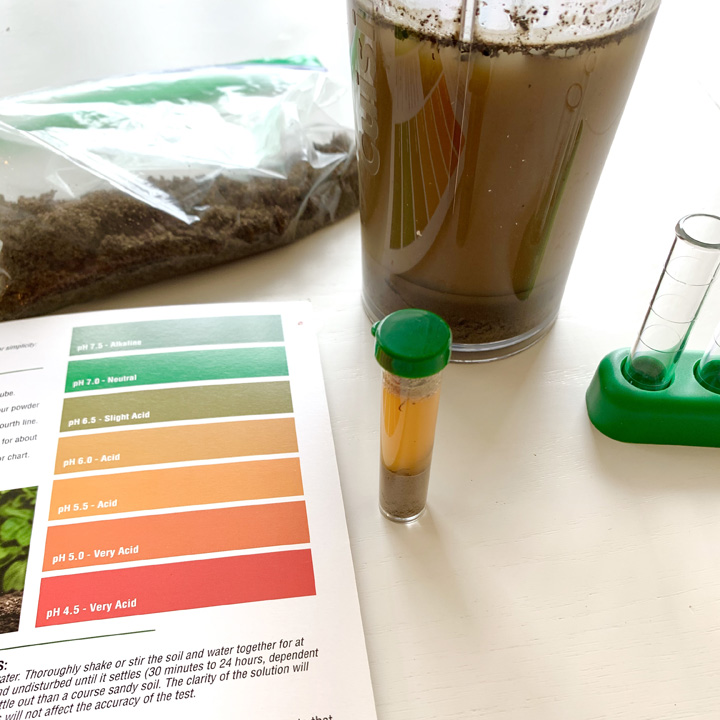
Another critical parameter is the soil pH level. Grass grows best when it is near a neutral pH, if the soil is acidic it can be hard for the grass plants to take up the proper nutrients even if they are present in the soil! The most accurate way to determine the nutrient level in the soil is to send off samples to your local agricultural extension office. I do this every single January to see how the product I applied in the last year changed the soil nutrient profile. You can conduct these tests yourself at home as well and the kits can be found Lowe’s in the lawn & garden section. I tested one out on a soil sample that I knew was going be acidic and was able to clearly see the acidity level on the chart provided!
Step 4 – Raise Soil pH if Needed
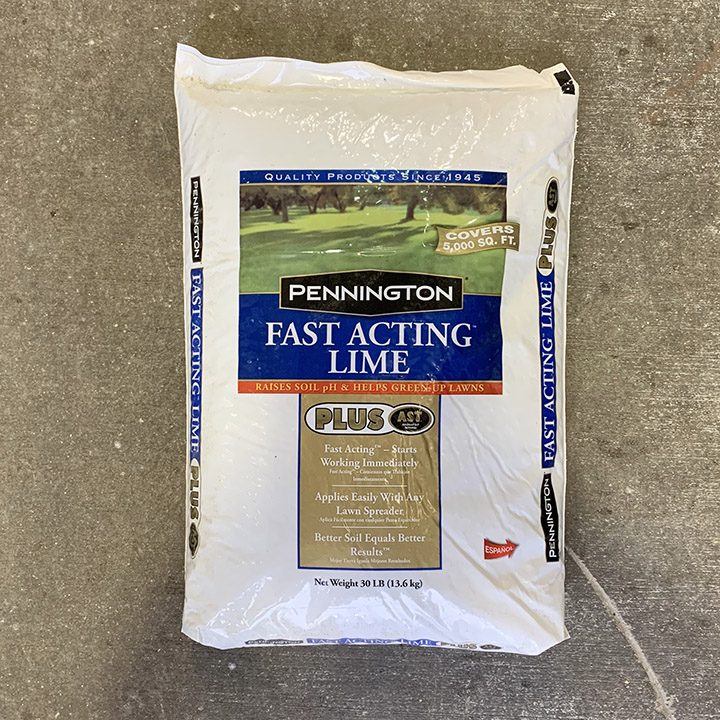
If your soil test shows that you need to raise the pH (this is pretty common) the best way to do it is through adding lime to the surface. The lime is a basic material and adding it, according to the rates listed on the bag, will help bring up the pH of the soil over time. Most lime can take a while to break down on the soil surface and can take up to a few months to start working. If you want faster results you can use a fast acting lime. I’ve always used the Fast Acting Lime by Pennington and it really does create results much faster. They are able to make the product fast acting because the particle size of the lime in the pellets is extremely small allowing it to work into the soil surface and break down much more quickly!
Step 5 – Control Weeds
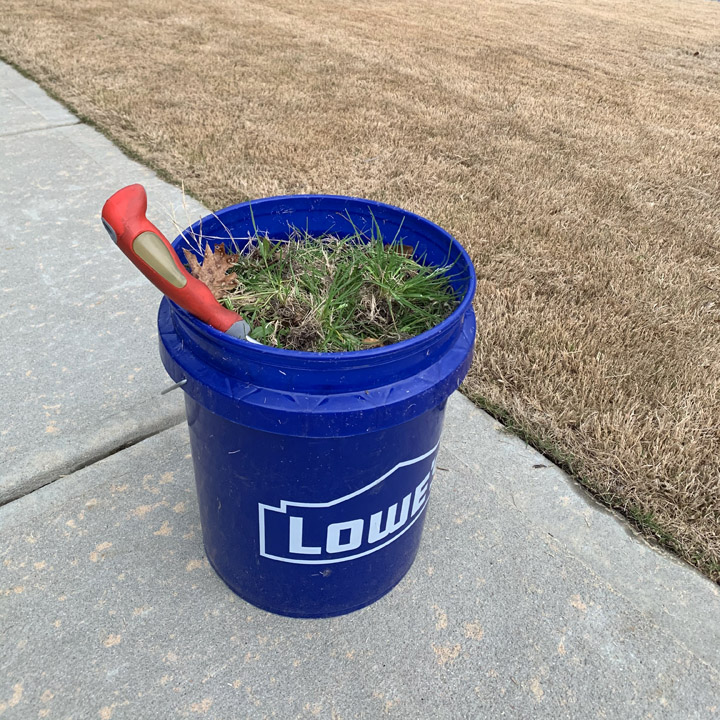
Weeds are the enemy of a nice lawn. Weeds often thrive in harsh conditions so when you neglect your lawn, not only does the grass suffer, but the weeds have a chance to take over. Once the weeds are there, they are not going away without you removing them. With neglect, a nice new sodded lawn can be overrun and replaced by weeds in matter of a few growing seasons. The number one way to control weeds naturally is to make sure your lawn has all the nutrients to remain strong. A thick canopy of grass shades out weed seedlings preventing most of them from ever getting a hold. The only other all natural method of weed control is hand weeding! It takes time and effort, but if you pluck weeds when they are young (I spend about 15 min a week doing this) you really can minimize the amount of weed controlling products you use on your lawn. I typically used a pronged tool to help me and use a Lowe’s 5-gallon bucket for easy collection!
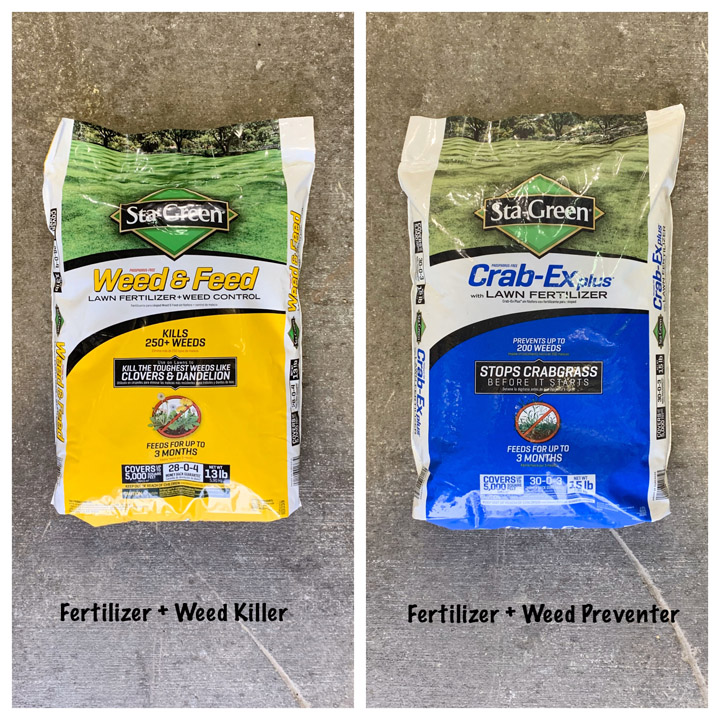
Weed control products are another option but it is important that you use these type of chemicals only when needed and apply them exactly according to the manufacturer’s instructions to minimize the impact on the surrounding environment. There are two major classes of weed control products that are typically spread (or sprayed) on the lawn: pre-emergent herbicides (weed preventer) and post-emergent herbicides (week killers).
Weed preventers work by adding a chemical to the soil that soaks into seeds and prevents them from germinating. It really is the most effective way to control most weeds with chemicals because they just never get going in the lawn. I typically apply this type of product to my NC lawn in early February and then again in late April. Those two applications are the only herbicides that I use on the lawn all year. Some weeds will always still make it, and they are typically so few that hand weeding the rest of the year is really quick. One really important note to make is that weed preventers will also prevent grass seed from coming up so typically you have to wait 8-12 weeks after application to plant grass seed. Keep this timing in mind if over-seeding is going to be a part of your lawn plan. Re-seeding is typically most effective in the fall (where the new grass plants have the fall and the next spring to establish before the summer) so it’s usually best not to use this type of product after late spring.
Weed killers work by sticking to the surface of weed leaves where they are taken up by the plant and then kill it. This type of product works well and is often needed when there are way too many weeds to remove by hand. Weed killers can be used most times of the year but they can also harm baby grass seedlings and so you should plan to use them way in advance of over-seeding.
Both of the types of weed control products mentioned previously are sometimes combined with fertilizers to allow consumers to make fewer applications. Read the bags carefully to know what is actually in them, is it fertilizer and weed preventer or fertilizer and weed killer? Both exist!
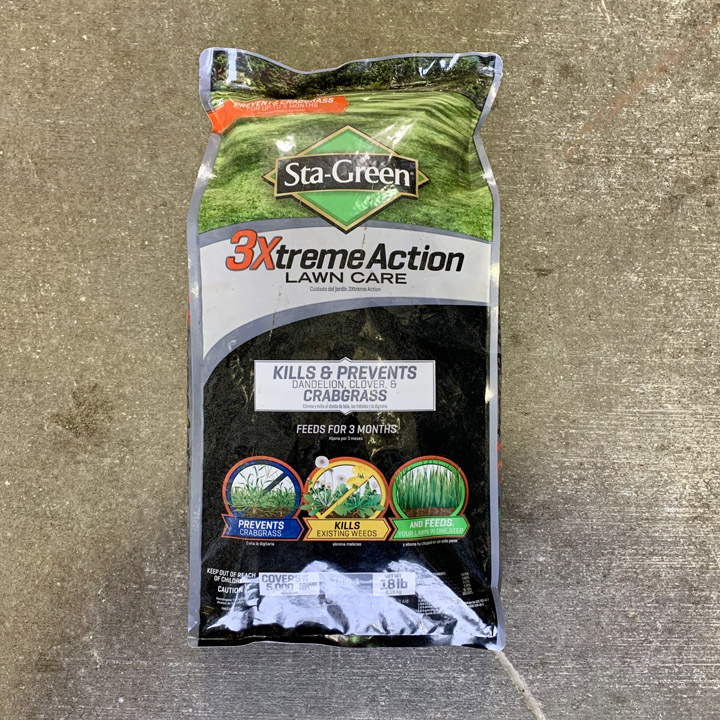
To make it easy for consumers that have a number of actively growing weeds, want to prevent new ones from coming in and want to feed their lawn at the same time, there are a few new products on the market (like the Sta-Green 3Xtreme seen below) that have all three components in the same bag!
There really are so many choices of products and if you feel like you need more information, head to Lowe’s and talk to one of their team members in the Lawn & Garden department. They have experts on hand that can help walk you through the different options!
Step 6 – Feed Your Lawn
Your lawn needs the right levels of nitrogen, phosphorous and potassium to hit its optimal growth. Every bag of fertilizer lists how much of each of these components is in the bag as a series of three numbers separated by dashes! They are always in the same order as seen in the picture below. The numbers represent a weight percentage of how much of each component is in the bag. Let’s do an example based on the bag shown below (10-10-10). If the bag has a net weight of 40 lbs there would be 4 lbs of each of the three components in the bag. A comprehensive soil test will let you know how much of each component you should be adding per 1000 sq. feet of lawn.
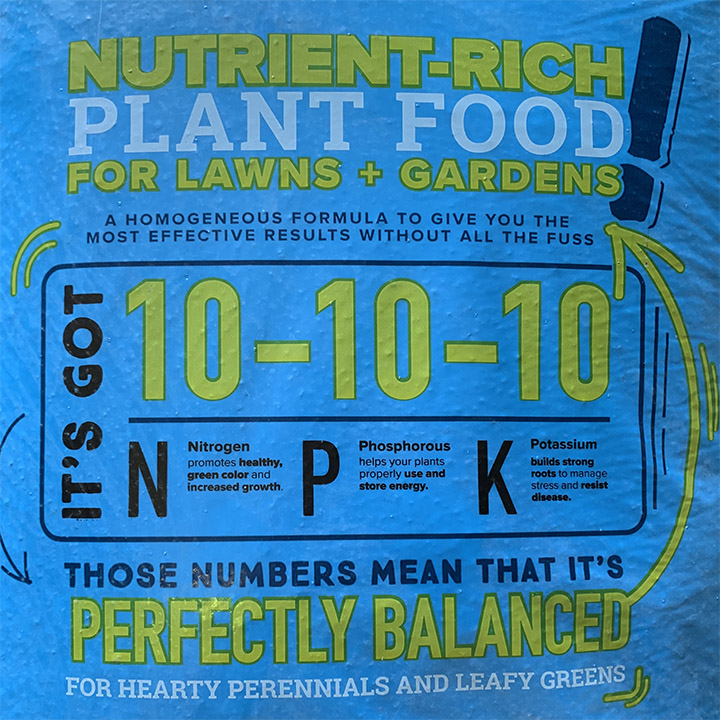
There are many different fertilizer products with varying levels of the nutrients. Plants use nitrogen much faster than the other components and so many of the fertilizers you will find have a much higher nitrogen content (for example the Sta-Green product seen below). If you want to use more eco-friendly products, they are available too. One I use every year is Milorganite, which is also seen in the picture below!

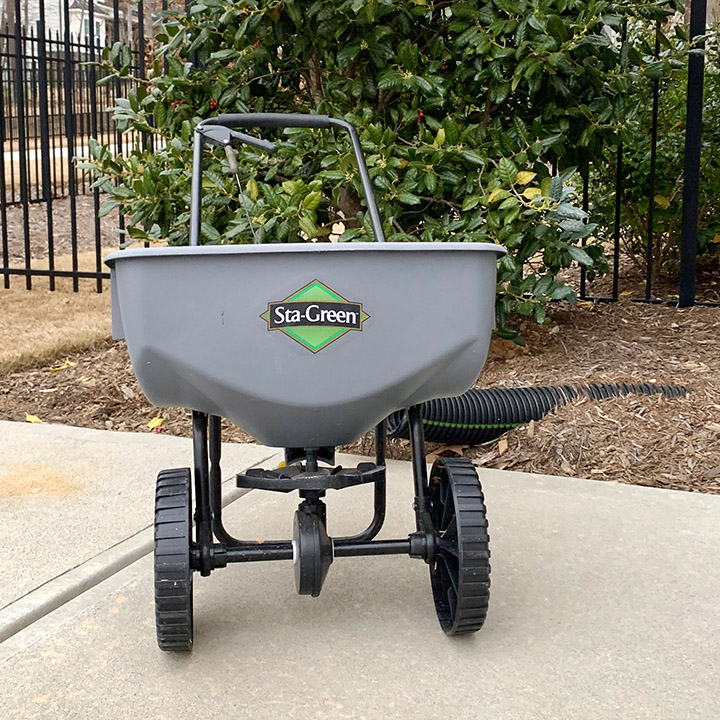
To apply the product to the lawn you will use a spreader. The spreader has a dial on it that controls the flow of the product onto the lawn surface. Most bags of fertilizer have recommended spreader setting for desired application rates, however I find them often to be a bit high. I always recommend starting at a very low spreader setting to get a feel for how fast the product comes out. You can always do another pass across a lawn section but it is impossible to take material back up if you apply it too heavy! To provide the most uniform application it is best to make two passes during the application of each product. The two passes should be perpendicular to each other. This helps prevent “striping” growth patterns where it is obvious that some areas were missed by the spreader.
By following all of these steps you will be setting your lawn up to have strong growth in the spring and ready to face the summer heat! If you want to see videos of my lawn tips head to my Instagram profile and find “Lawn & Garden” in my story highlights!