This easy DIY tutorial will show you how to prepare your concrete garage floor and apply a durable and beautiful epoxy coating! This project was sponsored by Rust-Oleum.
While concrete can be pretty, it is inherently a porous material that readily absorbs water and other liquids. The result is that freshly poured concrete in a garage can turned into a stained mess that is hard to clean over the years. Concrete coatings are a solution that, when applied correctly, prevent liquids and their associated stains from penetrating. Epoxies are high performance polymers that are popular for garage floor coatings because they can be designed to give a beautiful finish with many color options, are extremely durable and super easy to clean! Let me show you the proper way to prep your floor and apply this type of coating in your garage. Read through my process below and if you want to see videos, follow me on Instagram and find the story highlight “epoxy floors”!
Materials and Supplies Used
- Rust-Oleum Epoxy-Shield Professional Floor Coating Kit
- Rust-Oleum Epoxy-Shield Clear Finish
- Rust-Oleum Cleaner & Degreaser
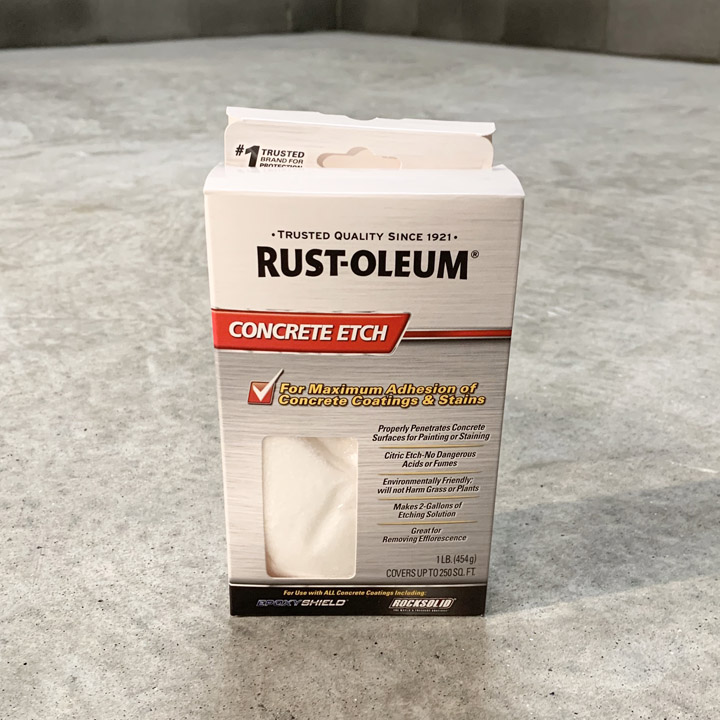
- Rust-Oleum Concrete Etch
- Rust-Oleum Anti-Skid Additive
- Rust-Oleum Decorative Color Chips
- Wire Brush
- Water Hose and Sprayer
- 5-gallon Buckets
- Infrared Thermometer
- Moisture Gage
- Paddle Mixer
- 4″ Chip Brush
- Paint Rollers (3/8″ and 1/2″ nap)
- Paint Roller Extension Pole
- Handy Paint Tray
- Respirator Mask
Step 1 – Surface Preparation (Cleaning)
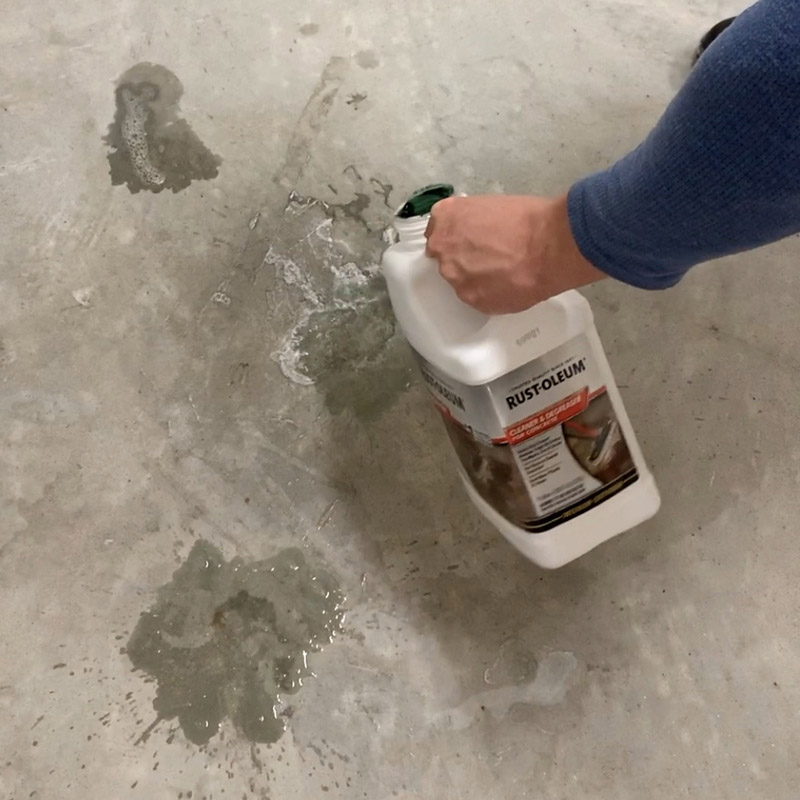
Proper concrete surface preparation is one of the most critical aspects of obtaining a long lasting and durable adhesion of your epoxy coating to the underlying concrete. If there are oils, dirt, dust, grime etc on the surface of the concrete, the epoxy will not be able to make permanent chemical bonds with the concrete surface. If no prep is done to get to a fresh concrete surface, epoxy coatings can debond over time creating serious flaws on your floor. If your concrete is not brand new you should first clean it. I used Rust-Oleum Clearner & Degreaser for this purpose. For oil spots I poured the cleaner directly on the spots to soak in while for general floor cleaning, I diluted the cleaner in a 5-gallon bucket according to the instructions.
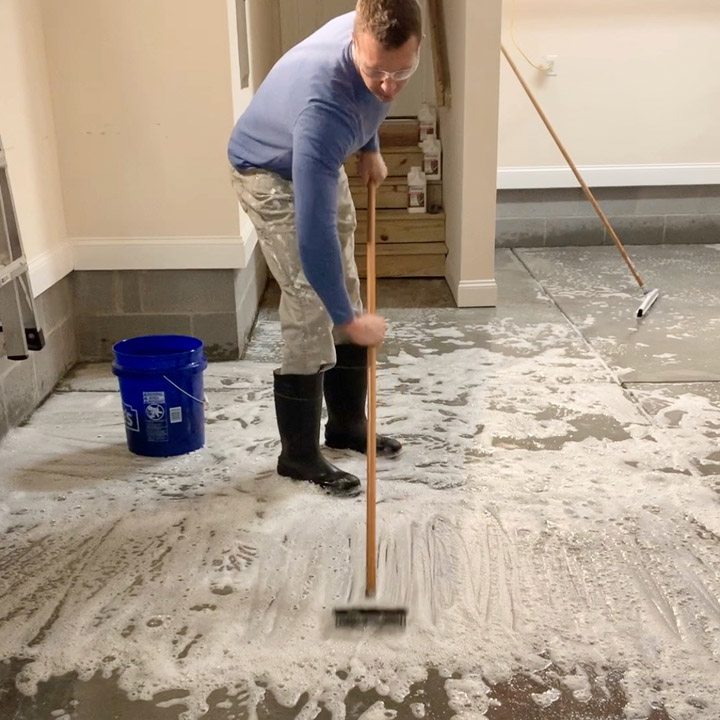
After mixing, I spread the cleaning solution on the floor in 10’x10′ sections and scrubbed the floor using a steel wire brush with a pole. I felt that the stiffness of the wire brush bristles gave me extra scrubbing power. After vigorous scrubbing I squeegeed off the excess liquid out of the garage and then used a water hose to do an initial rinse (my garage is properly sloped from back to front allowing rinse water to leave the garage by gravity). I repeated this process for each additional section of the garage.
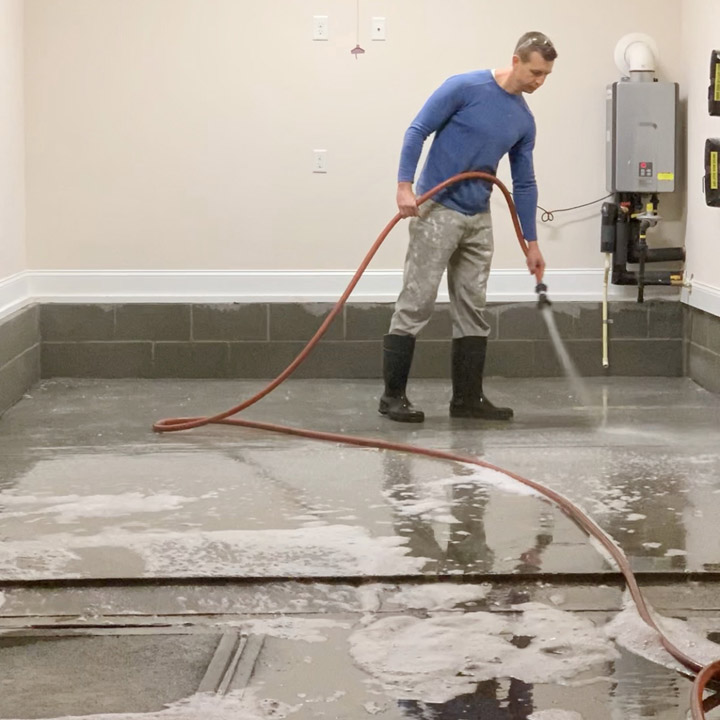
After the final area was cleaned I rinsed the whole garage twice with the water hose. I started at the back of the garage in each section and rinsed moving towards the garage doors until soap bubbles stopped appearing in the spray.
Step 2 – Surface Preparation (Etching)
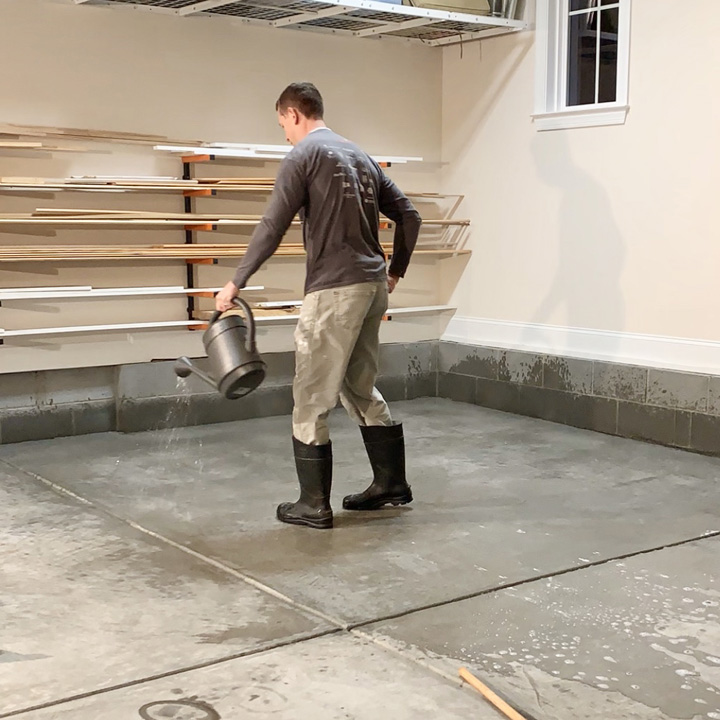
Etching concrete is the final step in the proper surface preparation before applying the epoxy coating. To make sure that there is a clean and reactive surface for the epoxy to bond to, the very surface of the concrete should be etched (which means a microscopic surface layer of the concrete is actually removed). Most concrete etchants are acids. The Rust-Oleum Concrete Etch I used was citric acid based (the stuff found in lemon juice) so I felt pretty comfortable that the diluted acid runoff from this process would not be affecting the environment. It comes as solid crystals that are dissolved in water. Make sure not to make the solution more dilute than instructed or the pH will be higher than desired and could dramatically change the etching rate.
After mixing, the instructions called for wetting a small section of floor then to squeegee off the excess water (no standing water, the concrete will just look “damp”). I used a watering can to quickly and evenly apply the acid solution to the floor. As soon as it is down you should start to see bubbles forming from the etching reaction and I could even here a fizzing sound.
I used a soft bristle scrub brush to work the acid into the area for about 10 minutes and could see a light salt precipitate forming from the reaction between the concrete and acid. After 10 minutes I squeegeed off the excess and rinsed that area.
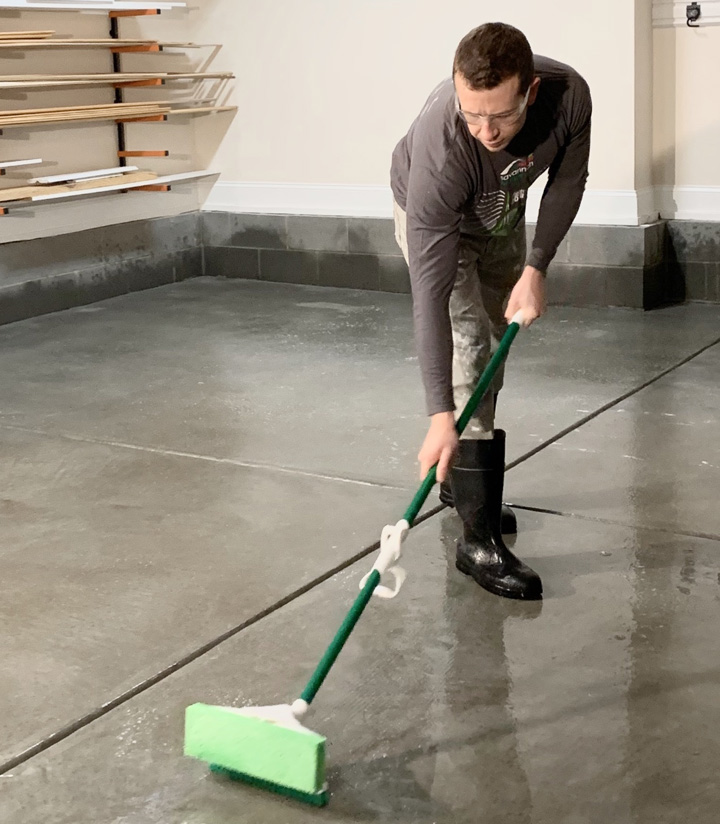
The etching instructions called for a double rinse and I actually used the soft scrub brush after the first rinse because I could see in some areas that the salt precipitate was not rinsing away easily. After that final scrubbing and rinsing the floors looked completely clean. I did the cleaning and etching steps on different evenings but for my three car garage of 850 square feet both together took me about six hours.
Step 3 – Floor Drying
You do not want trapped water under your epoxy coating. Even with the best surface preperation you will be risking reducing the adhesion between the concrete and the epoxy coating. If you are epoxying a brand new garage floor you should wait at least 28 days after the concrete has been poured to epoxy because the water in the concrete mix is continuously reacting with the cement and evaporating over that period. Once you have cleaned and etched your floors in the steps above you must make sure that the concrete is completely dry before starting the next step. If it is the middle of the summer this may take 2-3 days. In the spring or fall you likely will want to wait a week to make sure all the moisture is gone. If you are not sure when the moisture is gone you can use a Moisture Meter to monitor the levels.
Step 4 – Check the Floor Temperature
The epoxy kits are designed to cure within a certain temperature range. If the temperature is too high the reaction will occur so fast that you might not have enough working time to apply all of the coating evenly before it becomes too thick to work with. If the temperature is too low the reaction will be delayed and it is possible that it may never go to completion. I have read message board horror stories where epoxy coatings were applied at low temperatures and remained forever sticky. It is important that you determine if you are in the application temperature window or not by measuring the floor temperature. To do this I used an Infrared Thermometer.
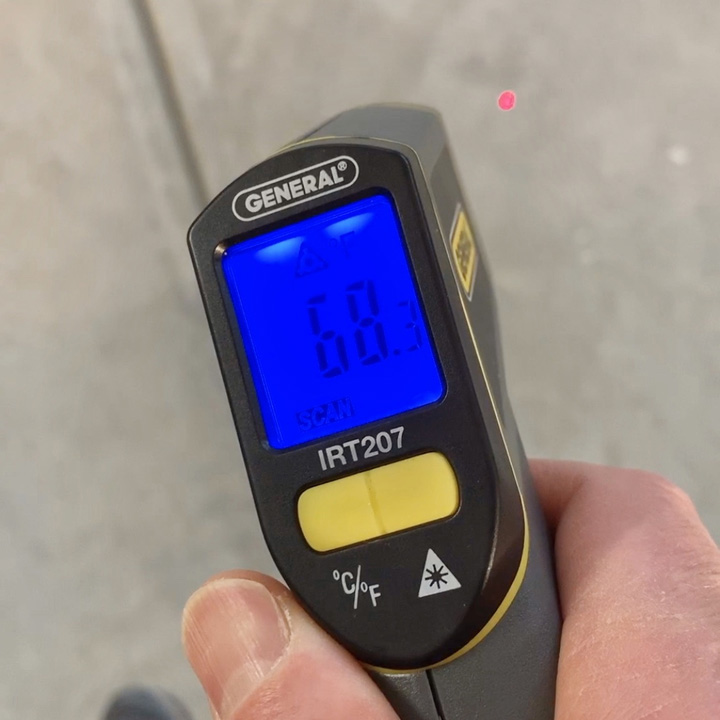
You can not rely on air temperature because it is often significantly different. I applied my coating in November in NC where the air temperature was in the mid 60s but the floor temperature was in the mid 50s. To get the floor temperature to the mid 60s I ran multiple space heaters for multiple days before and after the application. Unless you have to do it at a certain time I recommend you just wait until the air temperatures reach about 75-85 degrees.
Step 5 – Mix Epoxy Kit
Rust-Oleum offers multiple types of concrete coatings but I opted for their Epoxy-Shield Professional kit. The main reason being that this kit is known to go on a little thicker and be a little tougher than the water based Epoxy-Shield kits (which are sold at the big box stores). The professional kits are solvent based (meaning you will want to wear a respirator during application) but in the end I wanted the highest end epoxy product for my floors and was willing to pay a little more and wear a respirator.
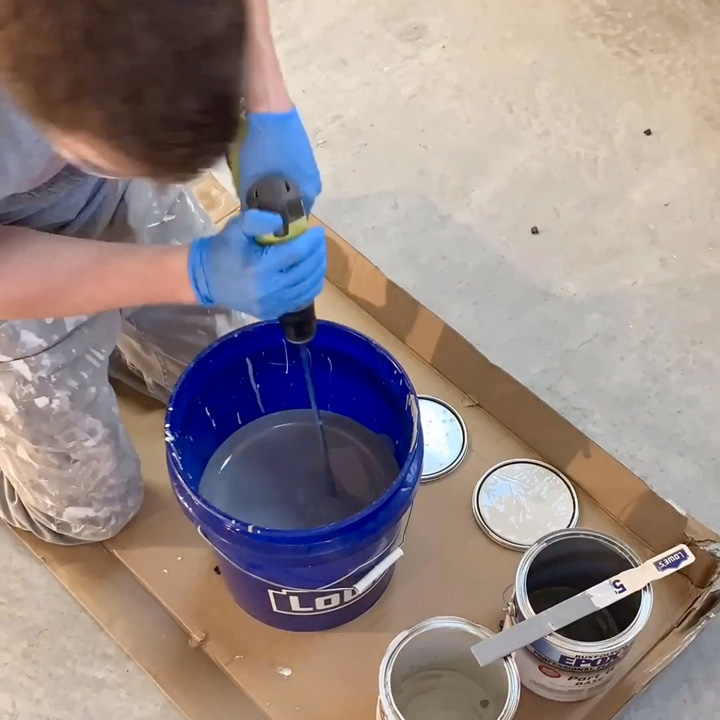
Epoxies form a hard durable coating when the two components (the resin and the hardener) are mixed together and react for form a covalently cross-linked polymer structure. During mixing it is critical that the two components are thoroughly combined. If you under-mix or you leave pure pockets of either component in the bucket, the performance of the coating will be degraded. Once I dumped the components into a 5-gallon bucket I used both a Paddle Mixer and and long mixing stick to make sure all of part A was combined intimately with part B. You can tell this has occurred once you do not see any swirls or color variation left in the mix. The epoxy formation reaction is exothermic and depending on the air temperature during the mix the instruction will tell you how long the mix should rest in the bucket (to allow the reaction to proceed) before applying it to your surface.
Step 6 (optional) – Paint Foundation Walls
Our house is on a block foundation and I wanted the foundation walls to match the floors so I used one kit (two gallons) to “paint” the foundation wall. I used Frog Tape to tape off the walls first and poured the mixed epoxy into a Handy Paint Tray. These trays are awesome because they are easy to move without spilling because they have handles and they hold a whole gallon of liquid! I used a roller with 1/2″ nap to paint the epoxy into the texture of the block wall and followed up any spots the roller could not get with a 4″ chip brush.
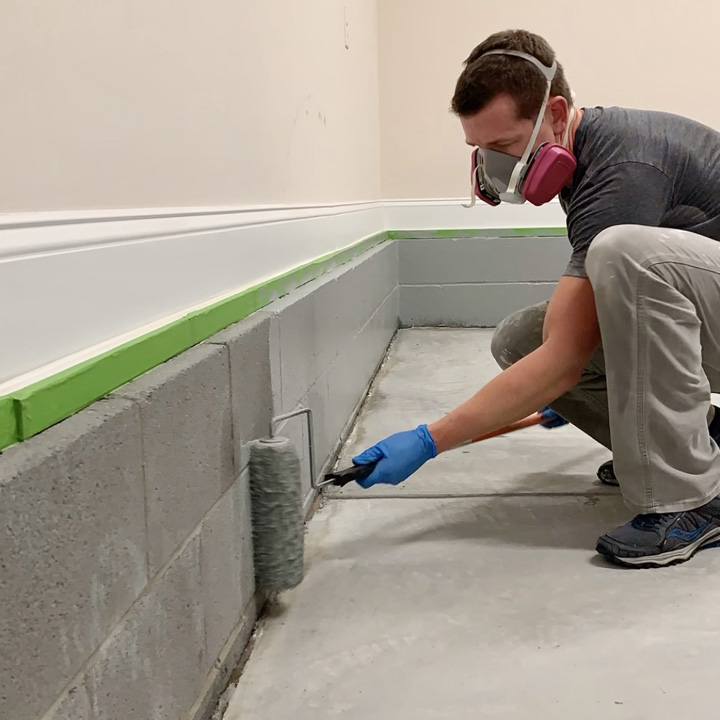
I used cheap brushes here because epoxy is really hard to get out of the brush and it would likely be ruined anyways. I didn’t worry about taping the floor because any epoxy that got onto the floor would be covered up by the floor coating. I waited 24 hours for the epoxy on the walls to cure before doing the floor because I did not want the color chips to stick to the block wall when applied to the floor.
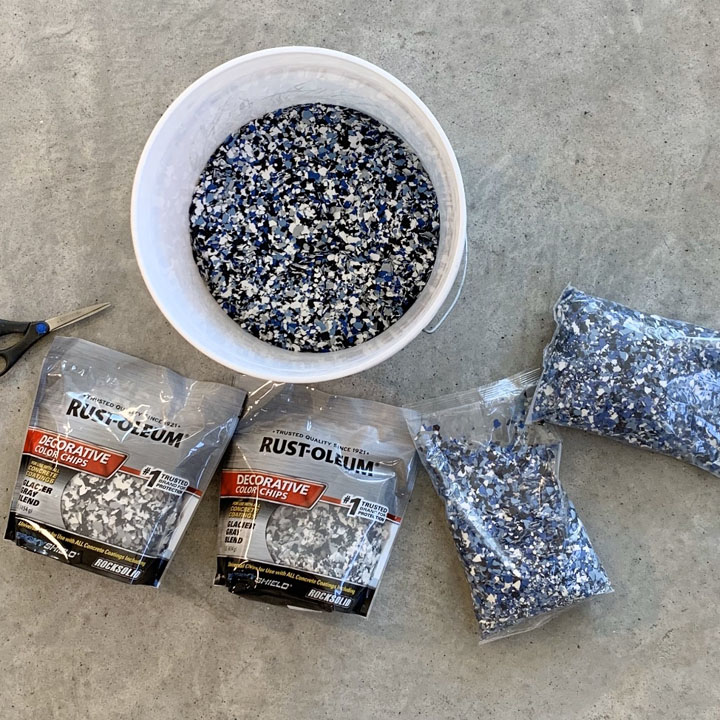
Step 7 – Color Chip Mix
The kit you use should come with a set of color chips. The performance of the coating will not be affected if you decide not to use the chips but most people should think about using them because they add a nice decorative feature and do a great job in hiding small flaws in the concrete and/or any inconsistencies in the application of the epoxy coating. I wanted a heavier coating of chips than are provided with the kits so I ordered six bags of extra chips. I also wanted a completely custom color chip blend so the extra chips I ordered were black/white/gray and I mixed them in a 2-gallon bucket with the blue/white/gray chips that came with my kits. If you don’t want extra chips I still recommend pouring all the chips from your kits into a bucket for easy application.
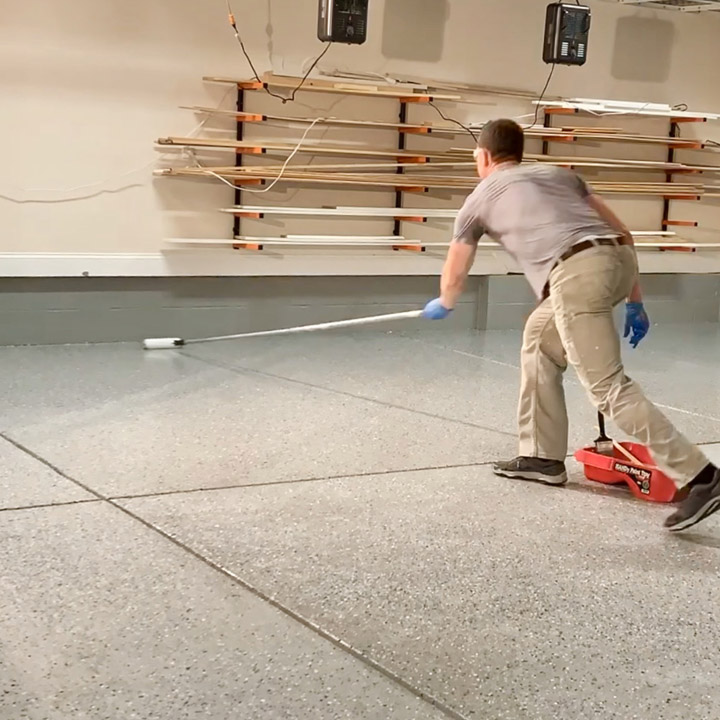
Step 8 – Apply Epoxy Floor Coating
For the most professional appearance you want a coating that is thick enough to hide the color from the underlying concrete and evenly applied so that you do not see roller marks. My Dad helped me with the application and I highly recommend having a second set of hands. He worked on cutting in the edges and joints with a 4″ chip brush while I rolled the main sections. The expansion joints in our garage broke the floor up into roughly 10’x10′ sections and I completed each one of these individually before moving on to the next. I dipped the roller directly in the 5-gallon bucket of mixed epoxy to get it on the floor quickly. I was able to do this large of a section because I had a large extension pole for my roller. To make it more manageable you may want to consider doing a smaller 6’x6′ section. I used a “medium” application approach. Not so thick that there were puddles of epoxy, but not so thin where I felt like I was “stretching it” with the roller. Once I applied epoxy to one section I back rolled that section at least twice and in two directions. Back rolling meaning using almost zero pressure with the roller to do a final smooth of the surface. When doing this, the roller naturally picks up excess material from thick sections and will deposit it in thin sections for the most uniform finish.
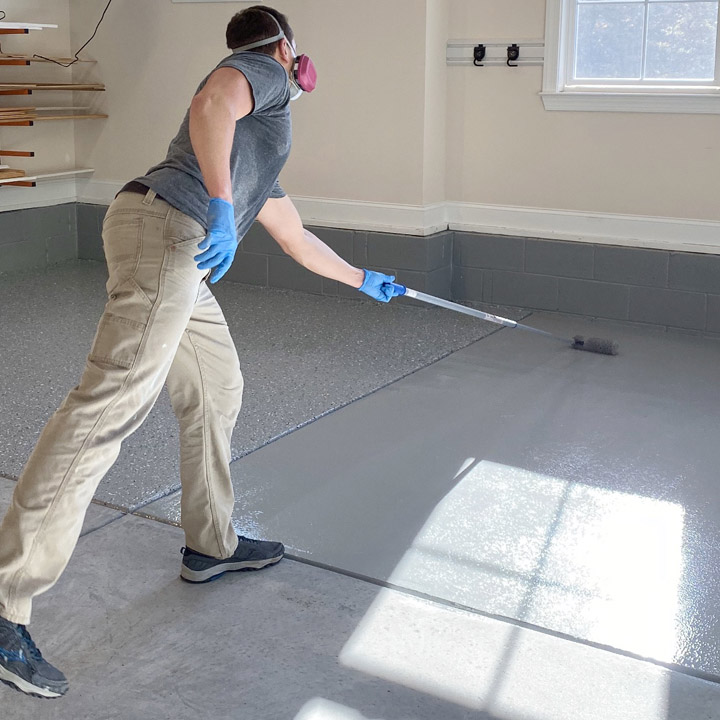
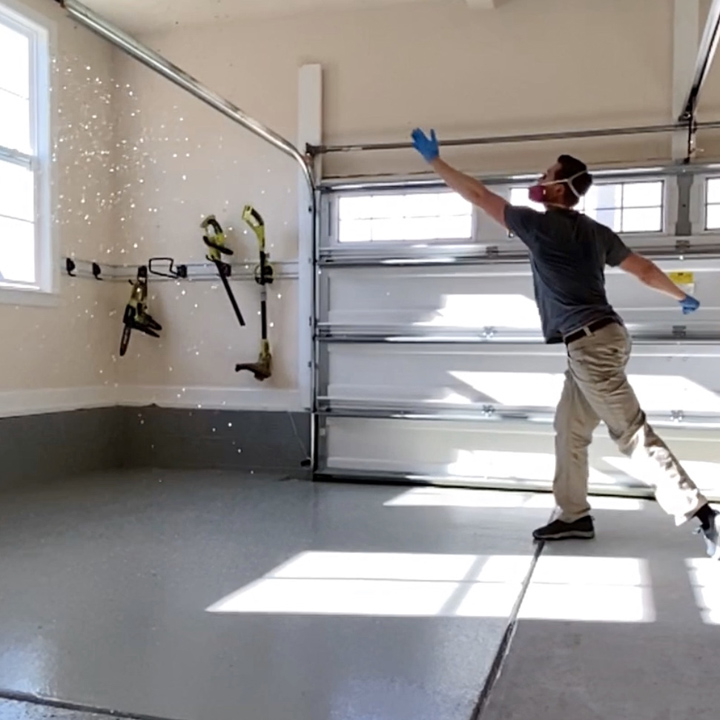
After finishing the epoxy application for a section I immediately applied the color chips to that section. I found that the easiest way to get the most uniform application is to throw the chips in the air as high as possible (even bouncing the chips off the ceiling) so that they are evenly distributed. I went lighter near the boundaries of the section adjacent to the areas that I would coat next as I knew they would be getting some more chips when I did the next section. I have also read that you can use a Handheld Broadcast Spreader to get a nice even application!
My garage is 850 square feet and I used three of the epoxy kits (six gallons) to coat it.
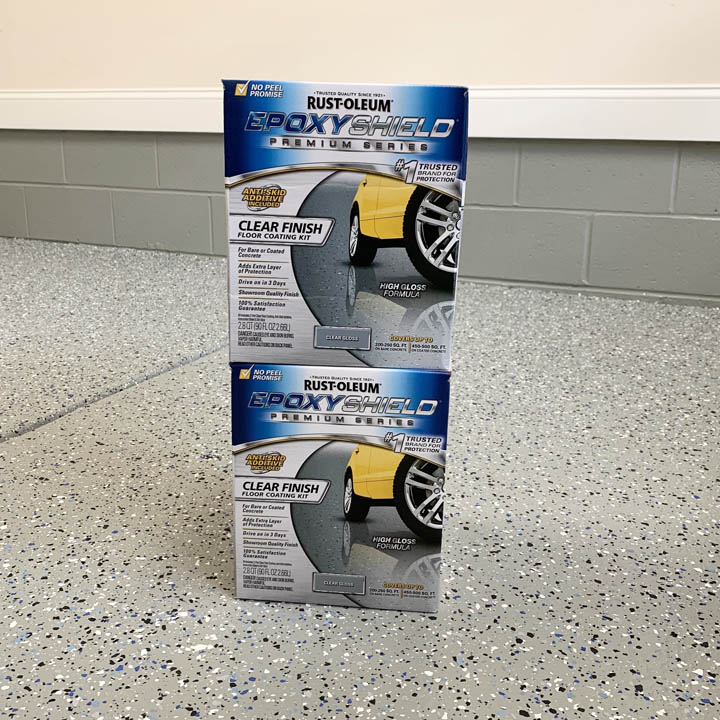
Step 9 – Apply Clear Epoxy Top Coat
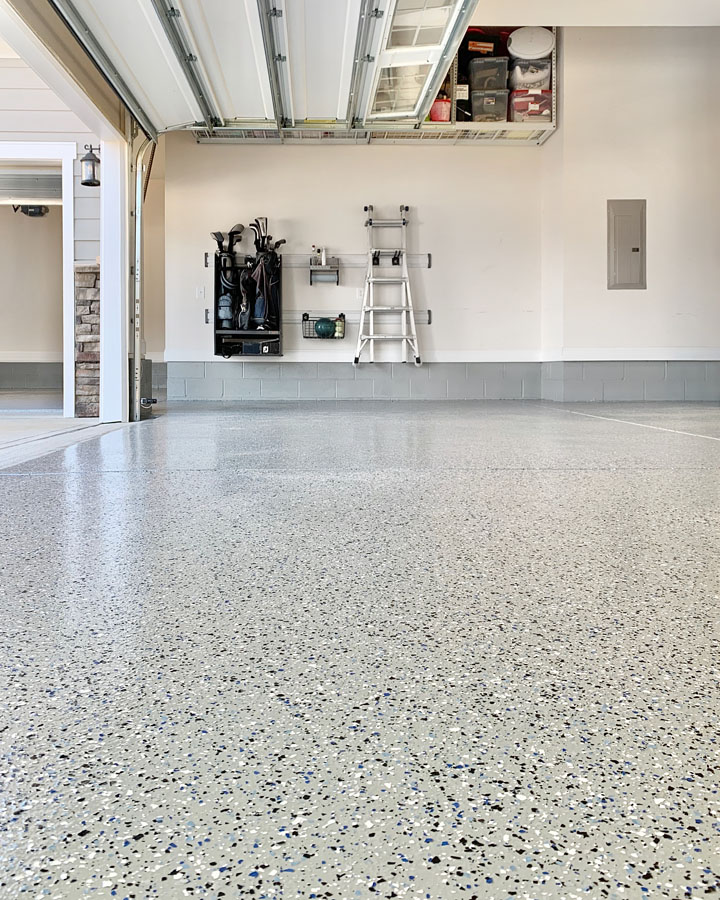
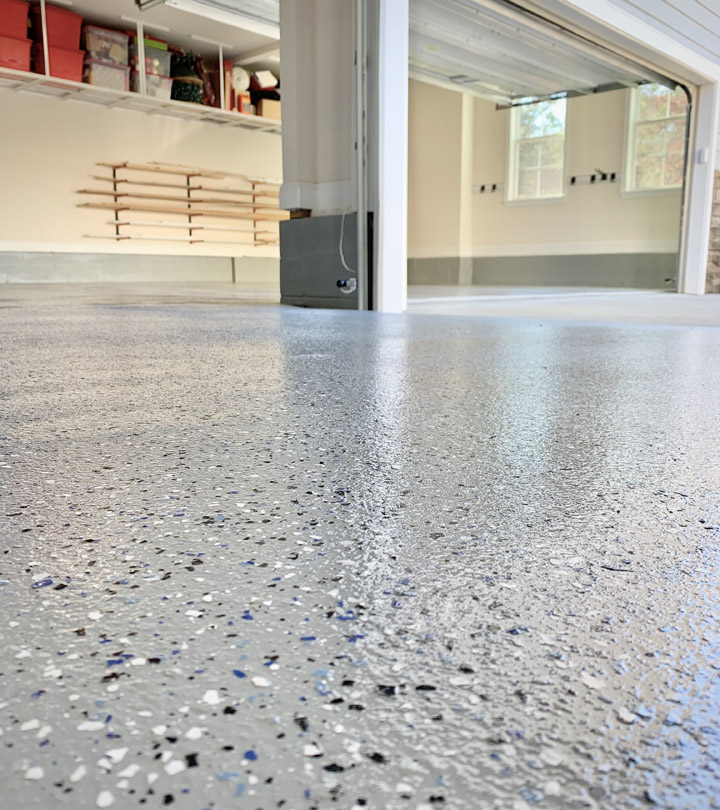
Approximately 24 hours after application you should be able to walk on the floor. Some people may choose to stop at this step but I recommend that you also do a clear epoxy top coat for a few reasons. The first is that you will get enhanced durability. The clear coat provides additional thickness to provide protection to the color base coat. If you get scratches in the surface most will stay in the clear coat and not penetrate all the way to the concrete, making the scratches less prominent. The second reason is that when you distribute the color chips many of them stay on the surface of the epoxy base coat. Some of the edges will not be embedded and so they can collect dirt or snag your socks as you walk through the garage. The clear coat will fully embed the color chips making them a completely integral part of the floor coating. Third, the clear coat is engineered to be high gloss so you get some extra showroom shine! I used Rust-Oleum Epoxy Shield Clear Finish.
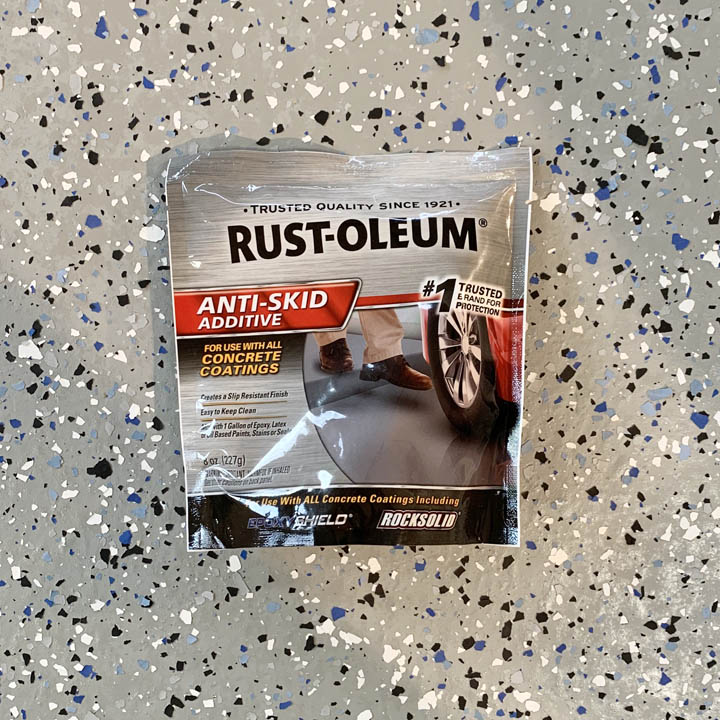
The epoxy clear top coat has a similar cross-linking chemical structure as the color base coat. To get maximum adhesion of the top coat to the base coat you have to apply the top coat within 72 hours of applying the base coat. This is because the base coat takes multiple days to fully cure (even though you can walk on it after 24 hours) allowing for functional groups in the base coat to bond with functional groups in the top coat! A gloss top coat can potentially be very slippery when wet so it is highly recommended that you use an Anti-slip additive in the mix. Some comes with the top coat kit, but I bought additional on Amazon.
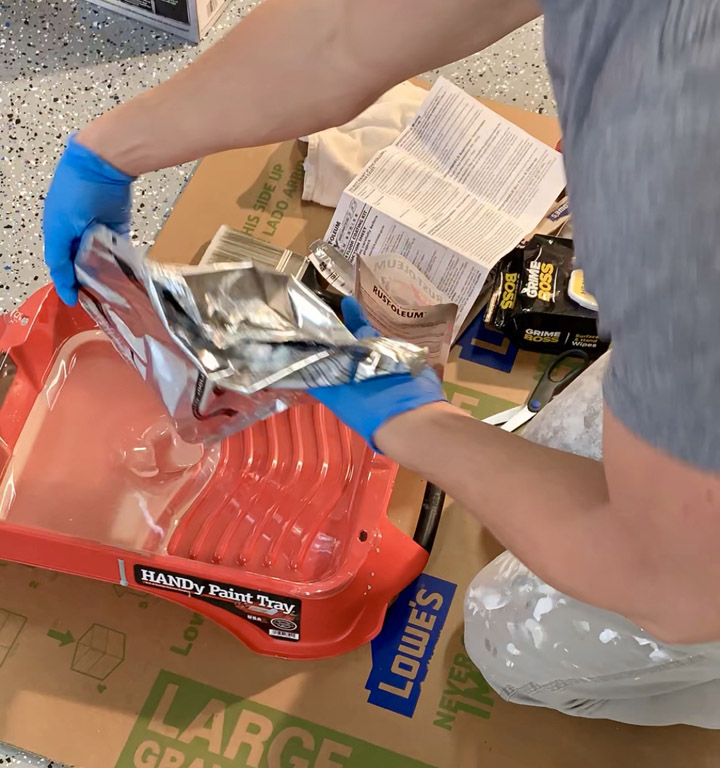
The Epoxy-Shield clear coat came in a burst pouch making mixing very easy. You break the internal separator and the two components flow together inside and you mix by massaging the bag. After mixing for a few minutes I cut the edge of the bag and poured the epoxy into the paint tray. I then added the anti-slip addative and mixed it in with a paint stirrer. The anti-slip additive can settle over time so I continued to mix every few minutes during the application.
I cut in the clear coat on the edges with another 4″ chip brush and I used a 3/8″ nap roller to apply the clear coat in sections. It was often hard to see where it had been applied (due to its clear nature) and so I made sure that I coated all areas by looking at the floor from a low angle (head near the ground) and by back-rolling multiple times. I used three kits to cover 850 square feet.
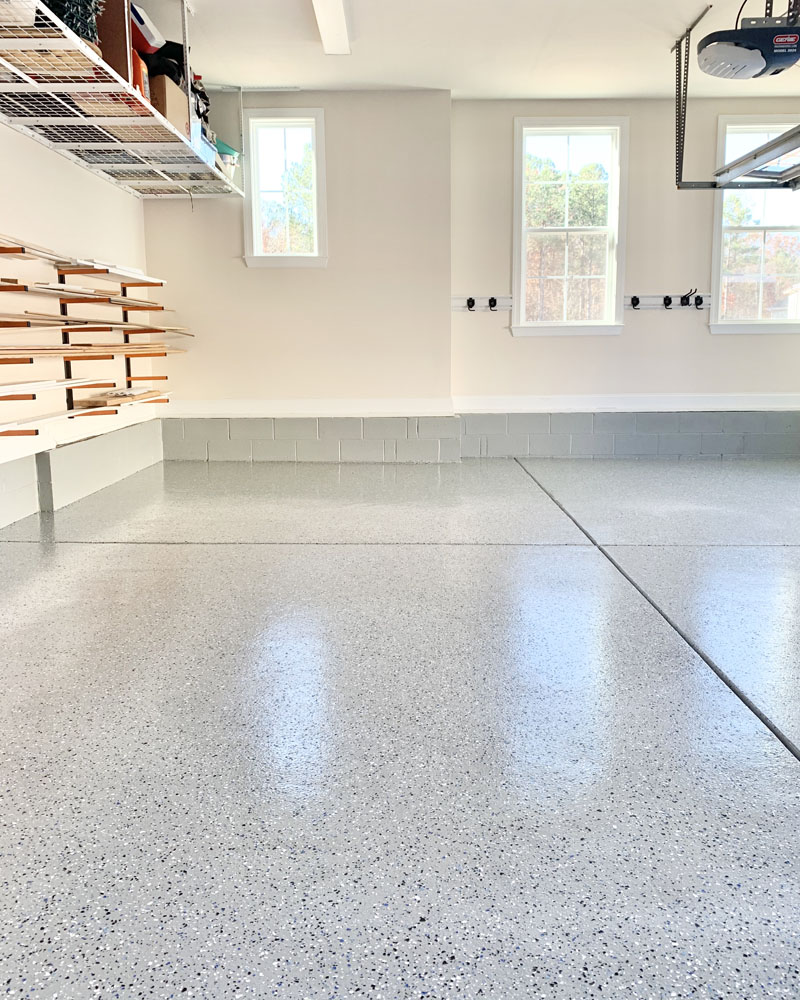
Final Impressions
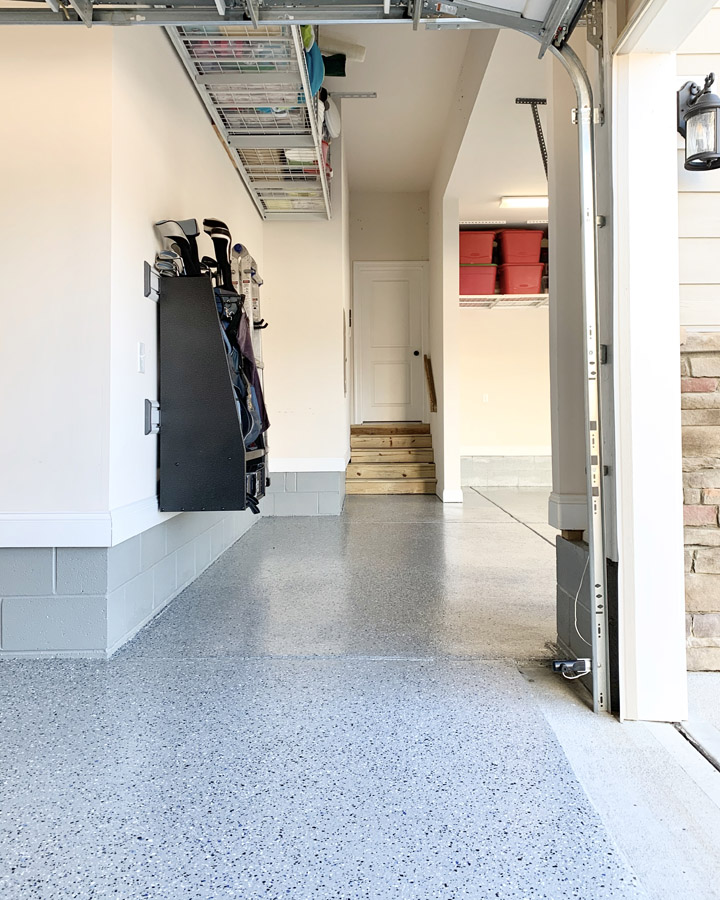
This project was a lot of work but conservatively I saved at least $2000 by doing it myself (based on how much neighbors have paid with similar sized garages)! The floor looks amazing and I know it will continue to look that way for years to come. The cured floor is very glossy but has enough anti-slip agent in it to provide traction in wet conditions. If you want to see videos of the whole process, follow me on Instagram and find the story highlight titled “Epoxy Floors”!
Thanks for the detailed directions! I watched you do this on Instagram and it did look like a lot of work, but the result is beautiful! And that’s great that you were able to save so much money!
It was a lot of work but very rewarding to have done it myself!