This DIY tutorial shows the major steps needed to build the raised craftsman playhouse of your kids dreams!
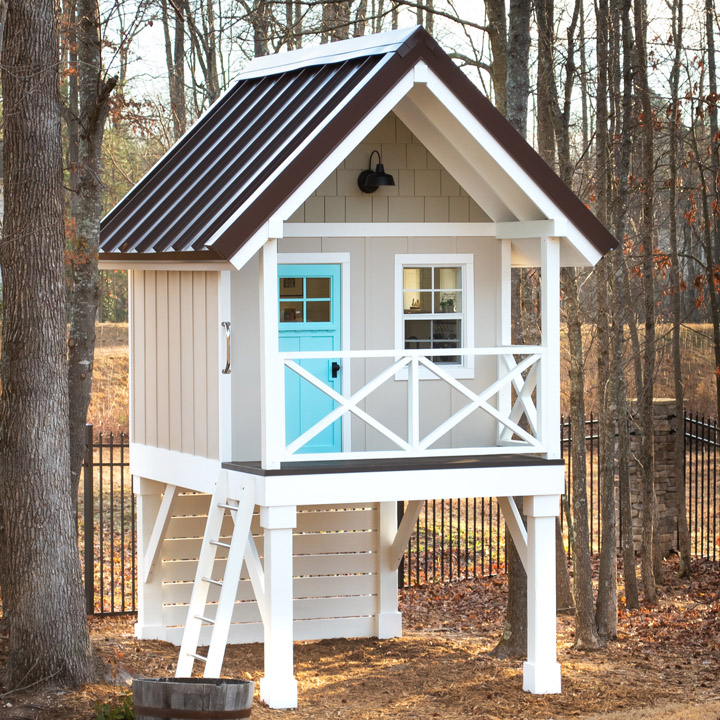
We thought about buying a pre-fabricated playhouse for the kids but then realized we could get so much for our money and design something completely custom with a craftsman style that would fit in with the design aesthetic with our house. I had a tree house growing up and we loved the idea of the playhouse being raised to give it an even more special feel! Before design and construction of a playhouse you should check your local building codes for any requirements for the size of structure that you want to build. In some areas, playhouses like the one seen here may even have to be permitted. Read all the way through to see the pictures of the inside finished!
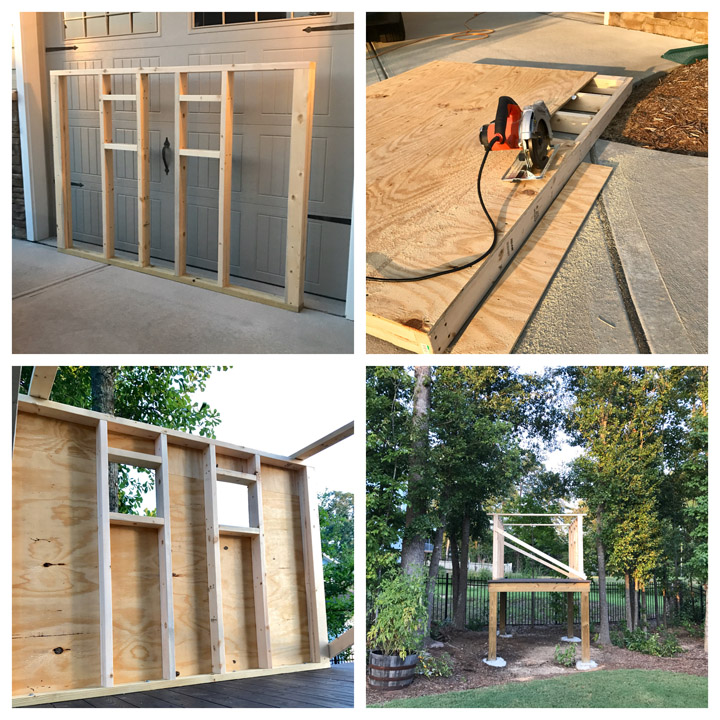
I used a lot of tools on this project (to many to list) but if you need a particular one to complete this project, stop by my Amazon Storefront to find a comprehensive list of the ones I use! I started by marking the corners of where the playhouse posts would be. I made sure the distance between each post was the same and that the diagonals were also the same distance (so that I would be making a rectangle and not a parallelogram). I dug the post holes deep enough and wide enough to meet code for a raised deck of the same size. I set the posts using a Post Level to make sure they were plumb and when they were in the exact position needed I used 1×2 boards with stakes to keep the posts from moving when pouring the concrete.
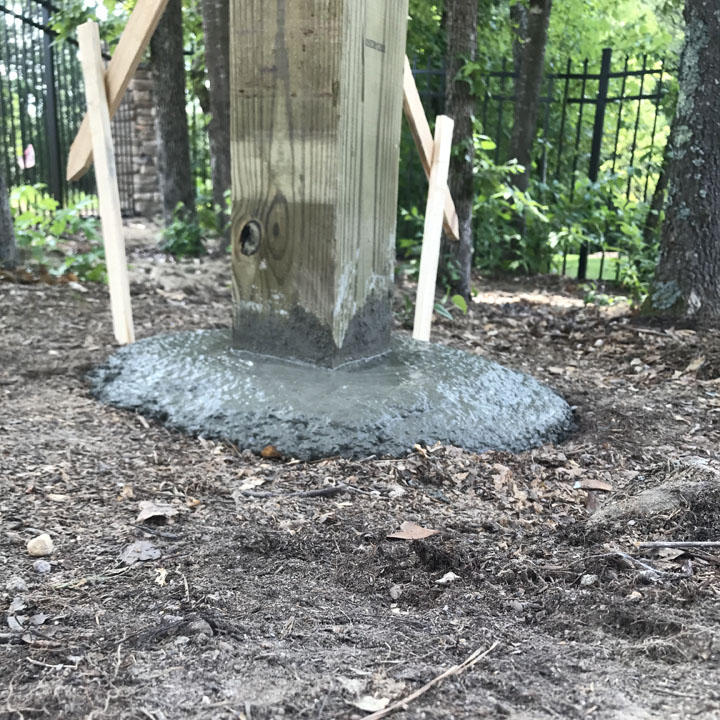
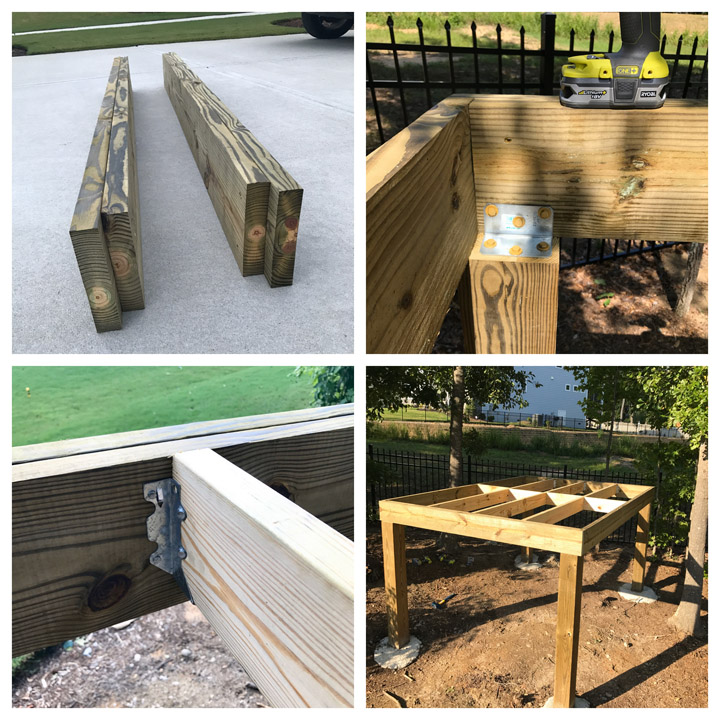
I used 6×6 posts that are rated for ground contact but to make sure the posts last as long as possible you want to build up the concrete in the post hole that water will run away from the post and never pool around the base! After I let the concrete cure for two days it was stable enough to start creating the deck framing. I started by making two beams from two sandwiched 1x8s. The beams sat on top of the posts and were secured into position using Simpson angle brackets and 4″ bolts into the top of the posts. The joists were 1x8s and secured by Simpson joist hangers. I used blocking between the joists to stiffen up the structure.
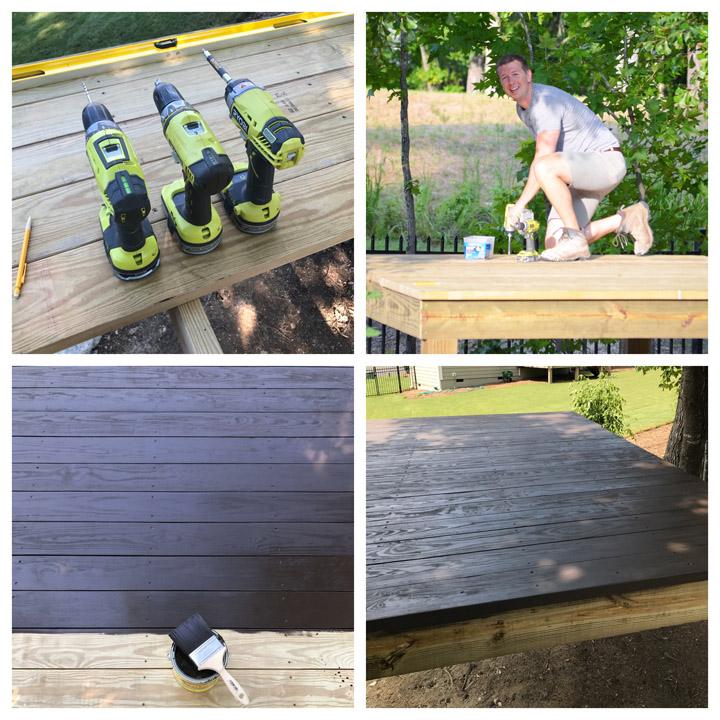
I wanted to stain the decking right away before the rest of the playhouse framing went up so I splurged for kiln dried decking board from my local lumber yard. Normal treated decking boards still have a decent amount of water in them from the treating process and so they should be installed first and allowed to dry for a significant amount of time before staining. Kiln dried boards have all that excess water removed in an oven, so they are dimensionaly stable and can also be stained right away. I used outdoor deck screws to attach the boards. I pre-drilled the boards to prevent any splitting. The stain I used was a Cabot Semi-solid oil base.
Then it was time for framing! I used a treated 2×4 for the sill plate (bottom horizontal member) for each of the framed walls. If there is ever any water that gets into the playhouse having this sill plate as treated wood will prevent rot. I screwed all the 2x4s together with 3″ outdoor screws and an Impact Driver but you could also use a framing nailer to complete this task. I included framing for the windows that I purchased from shedwindowsandmore.com. I sheathed the framed walls with 1/2″ thick plywood and then cut the excess along the edges with a Circular Saw and cut out the holes for the windows with a Reciprocating Saw. I put up the walls individually and temporarily tacked them in place with some scrap 2x4s. Each wall was bolted to the floor using 3/8″ galvanized bolts.
I also used 3/8″ bolts to attach the four walls together! These numerous large bolts made me feel confident that the structure was extremely sturdy which was important to me because of it all being up on a raised platform. Once all for walls were in place I used 4x4s as beams for the rafters and the posts for the covered porch.
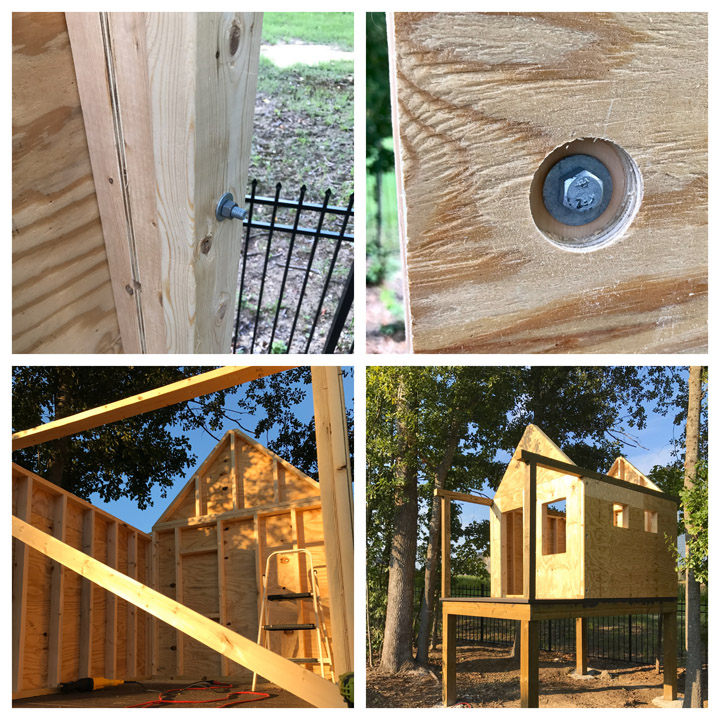
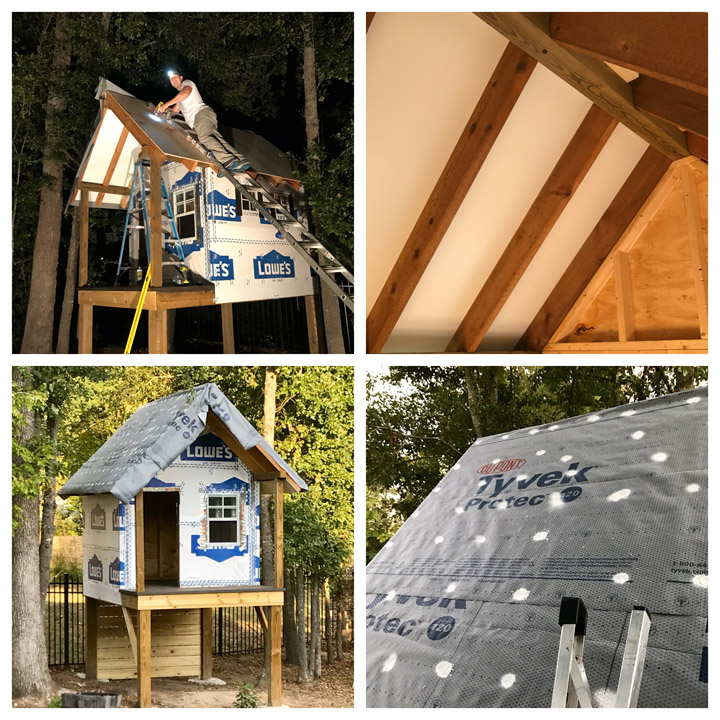
The rafters I chose were 2×6 rough cut cedar boards from Lowe’s. I chose these because the rafters would be exposed on the inside of the playhouse and I wanted a rustic look. I cut out notches for the rafters to sit on the beams and then screwed everything into place.
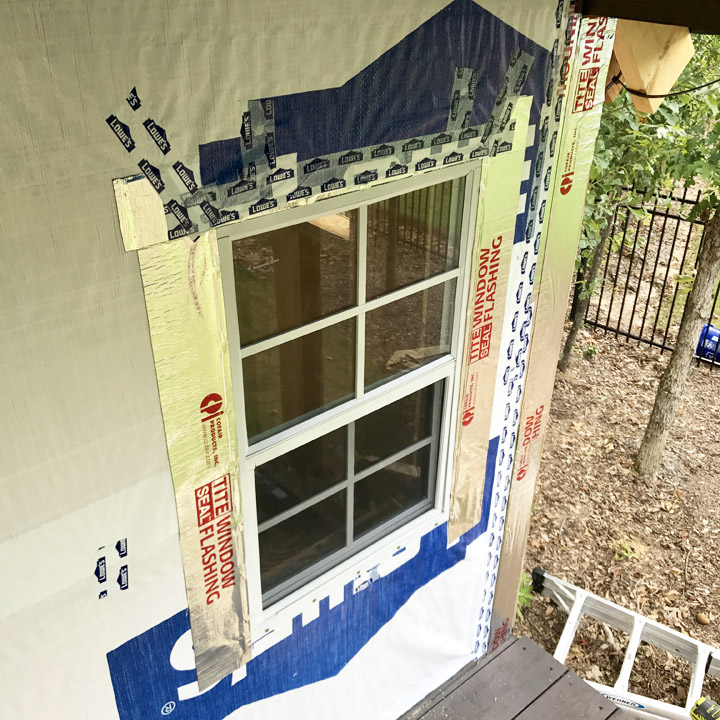
One skill I learned during this project is how to properly flash windows using Window Flashing Tape. The order of install is very important so that any water that that runs down the moisture barrier (behind the siding) will stay on the outside of the moisture barrier and the outside of the window. Every single overlap in the picture below was done in a particular order to properly shed the water. I used moisture barrier house wrap from Lowe’s on the whole structure and attached it using a Hammer Stapler. Each staple was covered with waterproof tape to prevent moisture penetration.
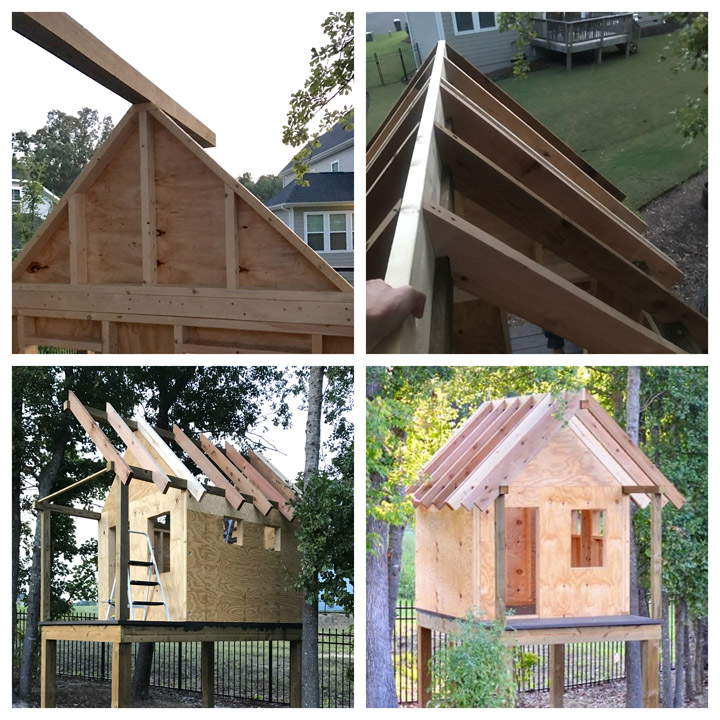
For the roof sheathing I used furniture grade plywood and painted the “inside” side in the driveway before installing. This saved a ton of time not having to tape off the rafters and paint the ceiling in place later. The roof was attached with 2″ exterior wood screws. I used Tyvek Roofing Underlayment on top of it and attached it using the same hammer stapler. I used a good shot of Flexseal on each staple to prevent water from penetrating.
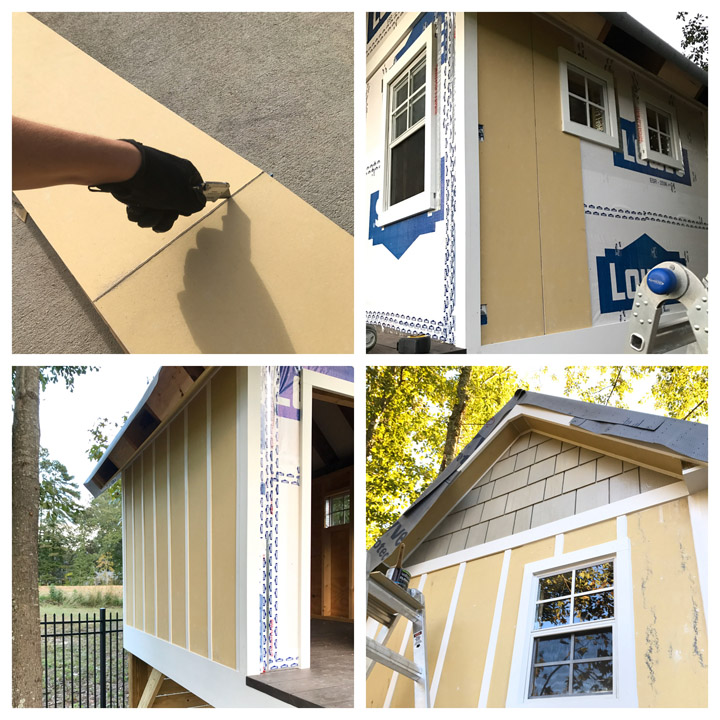
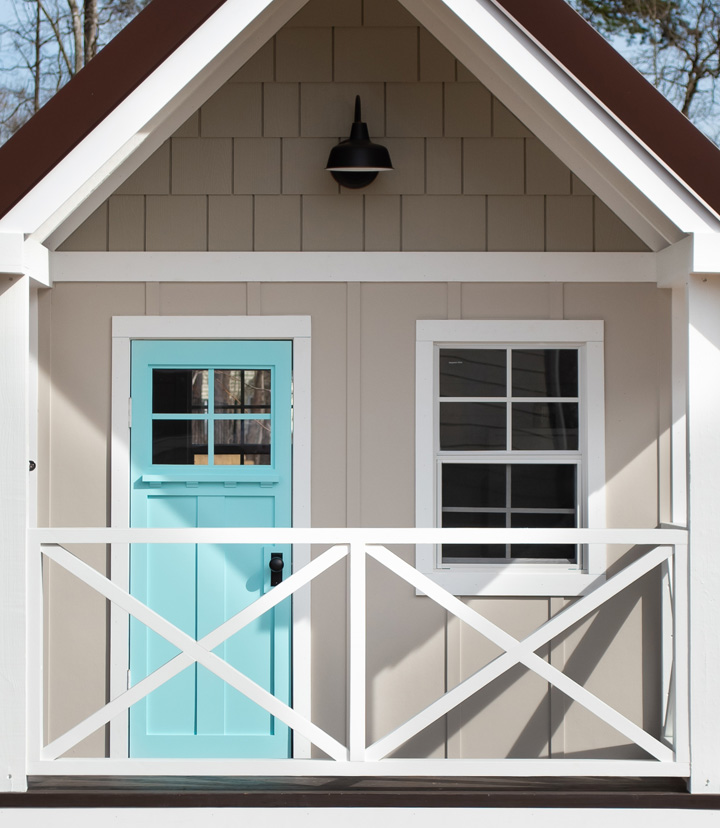
For the exterior of the house I wanted all durable, weather resistant materials so I used cement board for the boards (the 12″ wide kind that are typically used from roof soffits). The cement board was easily cut to size by scoring it multiple times with a Razor Knife and bending it! I covered the gaps with PVC lattice trim and trimmed out the windows, doors and eves with PVC 1x material. All of the exterior siding and trim was attached with Stainless Steel Brad Nails.
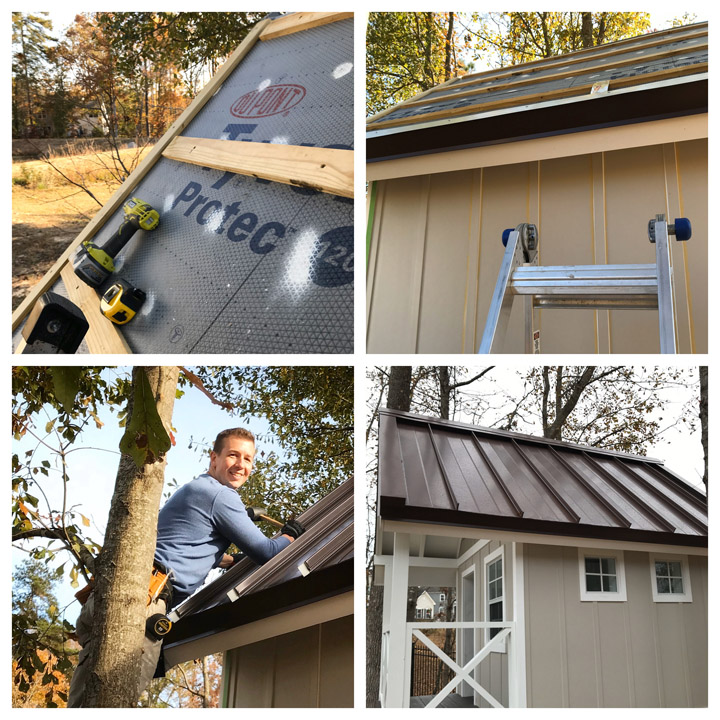
To up the craftsman charm I really wanted to do a standing seam metal roof on the playhouse. I found a color and style that matched the metal roof on our house (this also made the HOA happy) from McElroy Metals. Mounting the metal roof directly on the plywood would have meant that screws from the fasteners would be visible on the inside of the playhouse. To get around that I installed furring strips on the roof that were screwed through the plywood into the rafters. The metal roof was then fastened to the furring strips.
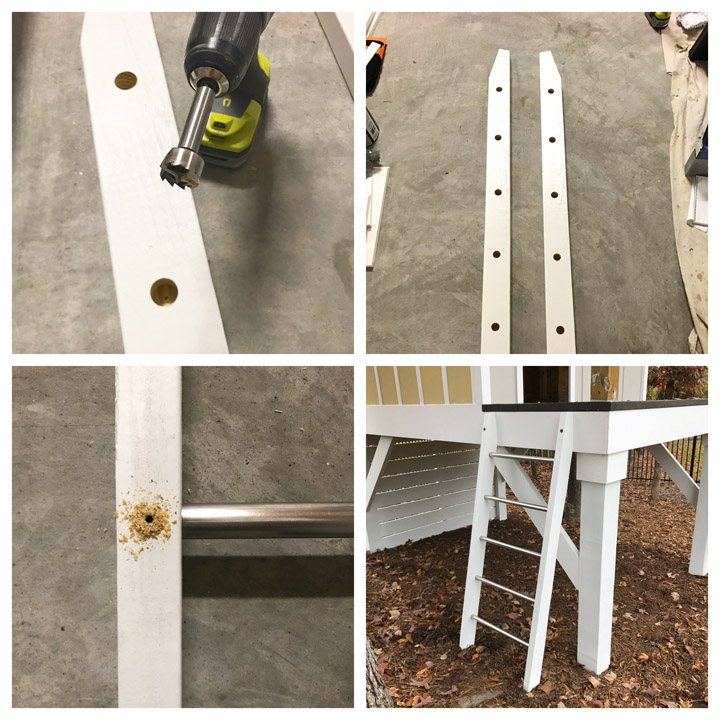
To get up to the playhouse I made a custom ladder out of treated 2x4s. To mount the rungs I used a 1″ diameter Forstner Bit make 1″ deep holes. I bought pre-cut 1″ diameter brushed stainless steel tubes from metalsdirect.com for the rungs. Once I assembled the ladder I drilled holes through the backside of the 2×4 and into the steel tube. I then used a screw to lock the two in place. When drilling into metal I recommend the use of Cobolt Steel Bits which are much more durable for drilling metals.
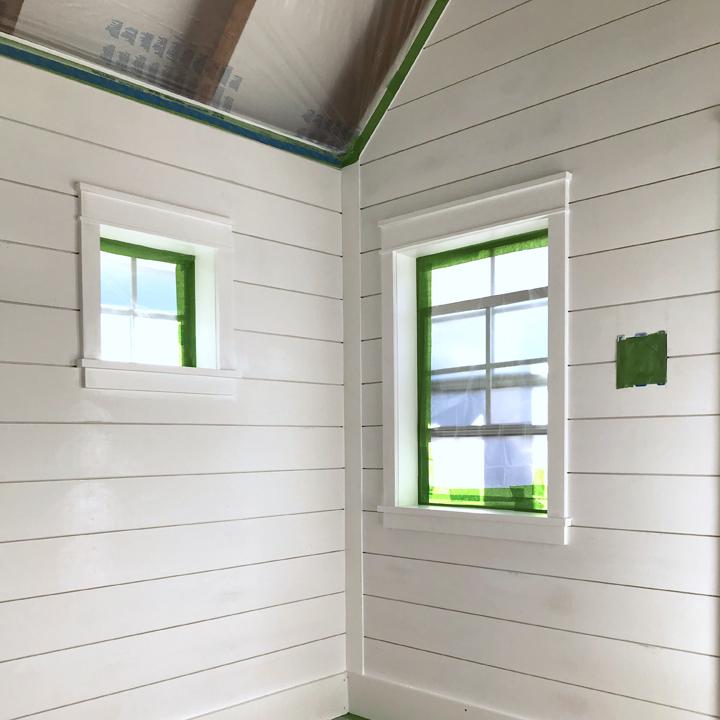
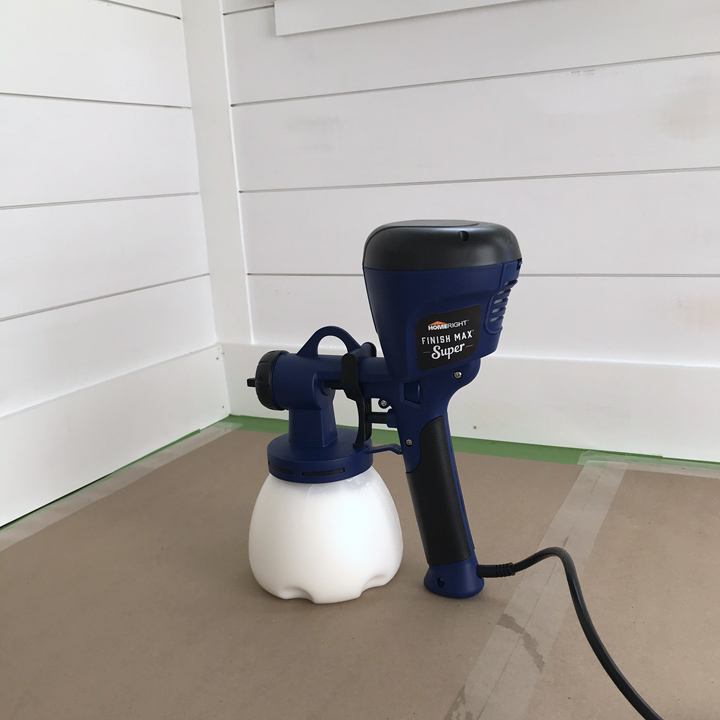
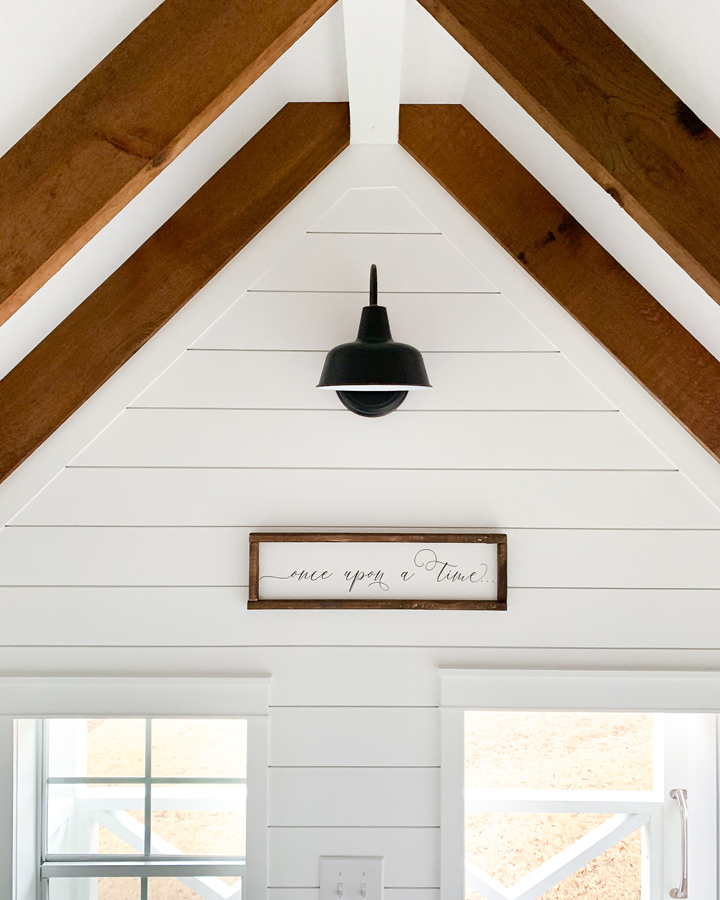
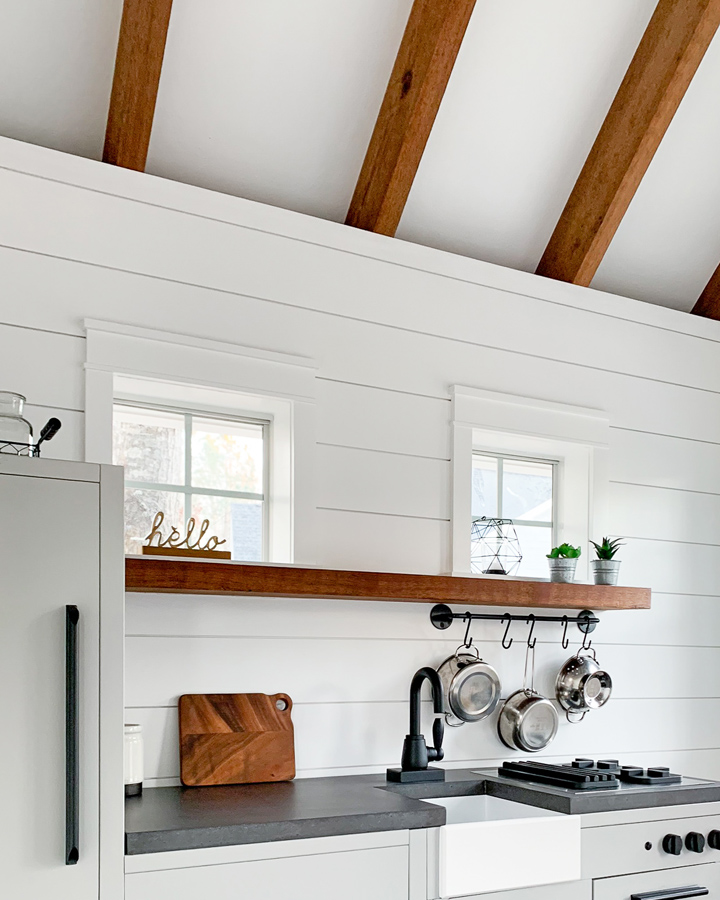
On the inside of the playhouse I used 6″ wide shiplap to cover all four walls! The trim was primed pine that I ripped down to dimensions that were proportional to the scale of the windows. To speed up the process of painting I decided to spray the inside walls. I used Pre-taped Painters Plastic to cover the roof area to keep the over-spray off of the cedar rafters.
My go-to sprayer is the Home Right Super Finish Max. It is pretty inexpensive and for the price does a really great job! This was my first project using it, but there has been many since and I still find it really handy! My biggest tip for its use is to make sure that you thin the paint to the proper viscosity and do practice runs before you paint something important!
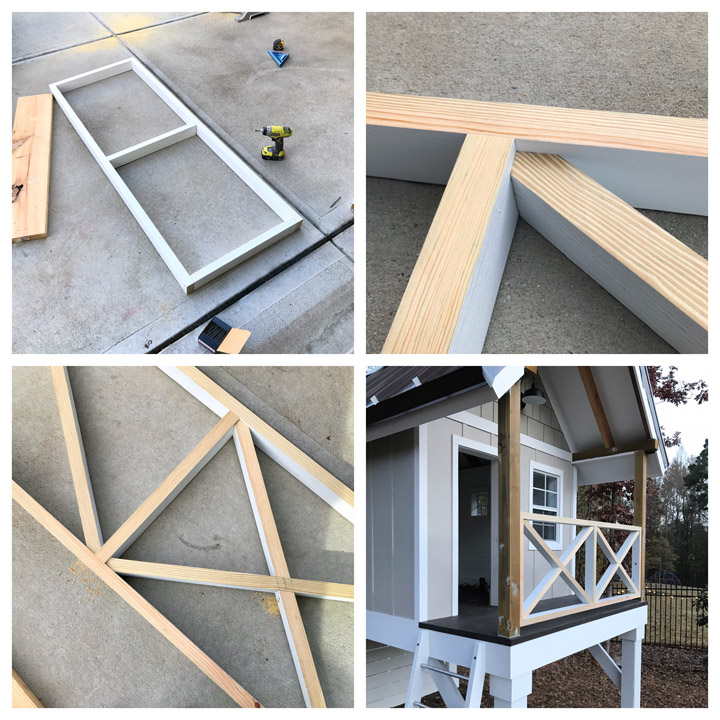
I made the crossing railing out of 2×4 lumber that I ripped down to 2.5″ wide (for the frame) and 2″ wide (for the Xs). I assembled all of the piece using exterior grade wood screws.
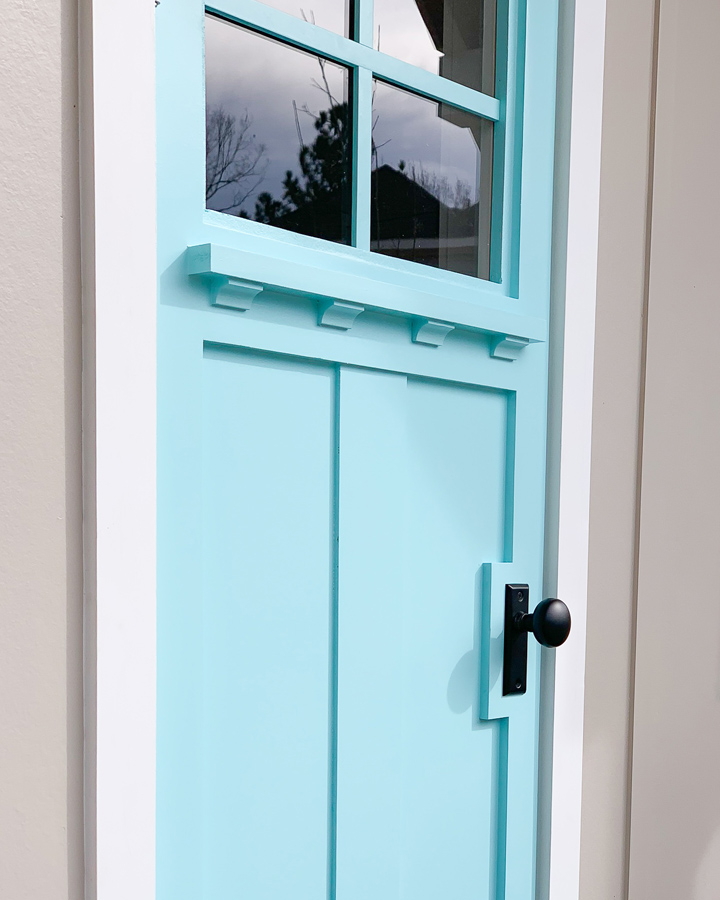
I finished off the playhouse by making this custom sized craftsman door. If you are interested in the process to make this, head on over to my Instagram Page and find the story highlight titled “Custom Door”.
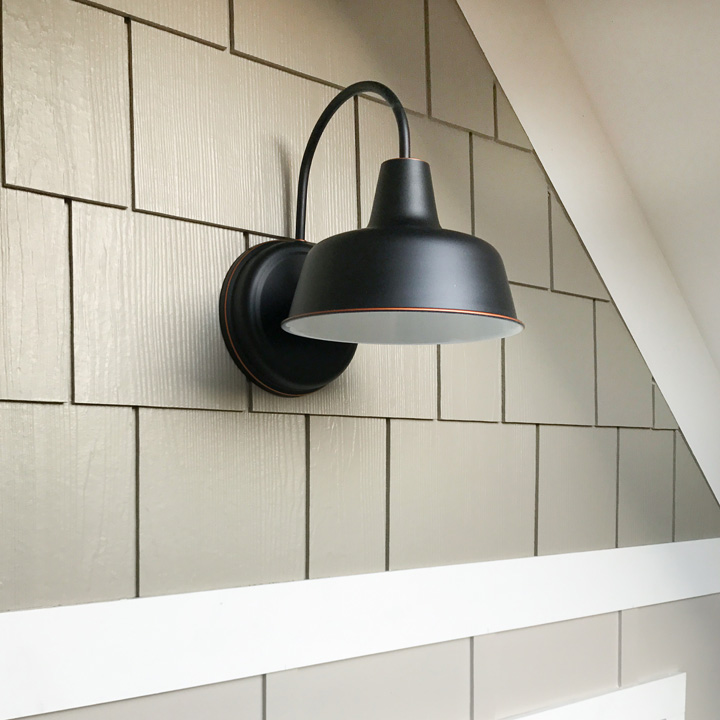
I also wired the playhouse for 12v DC lighting. I made a compartment underneath the playhouse for a 12v wheelchair battery and found 12v LED Lightbulbs that fit in regular sized sockets. Two of these Mini Gooseneck Lights were wired into the system and provide a bunch of light. I have only had to charge the battery twice over the course of a year using the playhouse!
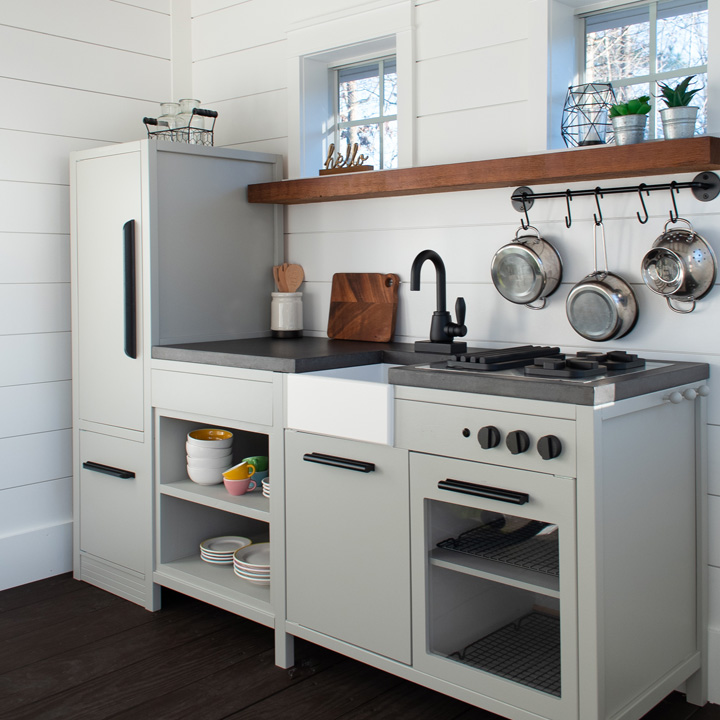
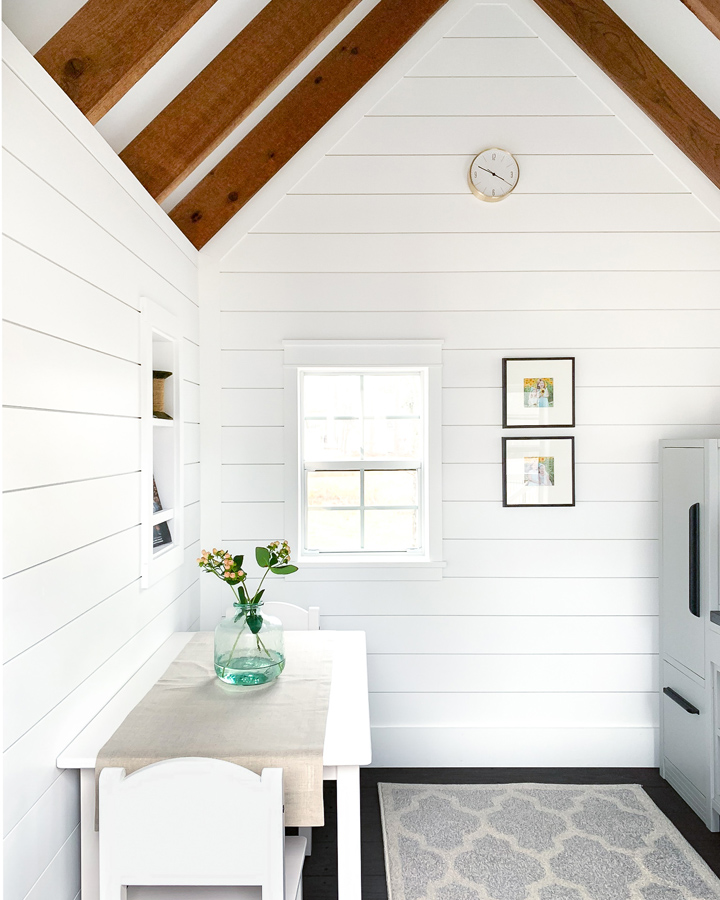
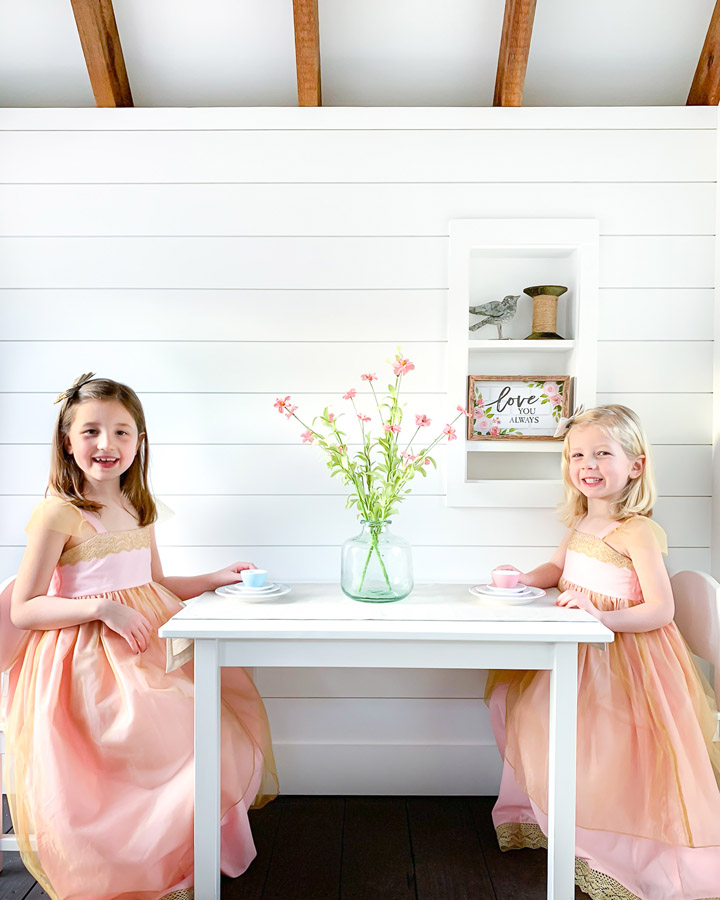
This was by far the most challenging and fun project I have ever done! It brings me so much joy to know my girls will have this amazing space to play in and make memories in as they grow up. Keep scrolling for pictures of the inside finished with my Magnolia Play Kitchen hacked kitchen equipped with real concrete countertops! If you want to see videos of the building process head to my Instagram Profile and find the story highlight called “Playhouse”.

Amazing little play house!
Thank you! So glad that you like it!